Thursday, 5 December 2019

The Rising Complexity of JAMstack Sites and How to Manage Them

When you add anything with user-generated content or dynamic data to a static site, the complexity of the build process can become comparable to launching a monolithic CMS. How can we add rich content to static sites without stitching together multiple third-party services?

For people in the development community static site generators are a popular choice over traditional content management systems (CMS) like WordPress. By comparison static sites are usually lightweight, highly configurable, fast, easy to use and can be deployed almost anywhere.

With static websites, no code is generated on the server; we've replaced databases and server-side code with APIs and build processes.

This has become known as a JAMstack, which stands for JavaScript, APIs and Markup. I have a strong persuasion towards JAMstack sites because I feel more in control of the output than I do when working with the often large and monolithic CMSs I’ve sometimes had to use on client projects.

Despite my enthusiasm, I'm often disheartened by the steep complexity curve I typically encounter about halfway through a JAMstack project. Normally the first few weeks are incredibly liberating. It's easy to get started, there is good visible progress, everything feels lean and fast. Over time, as more features are added, the build steps become more complex, multiple APIs are added, and suddenly everything feels slow. In other words, the development experience begins to suffer.

It usually looks something like this:
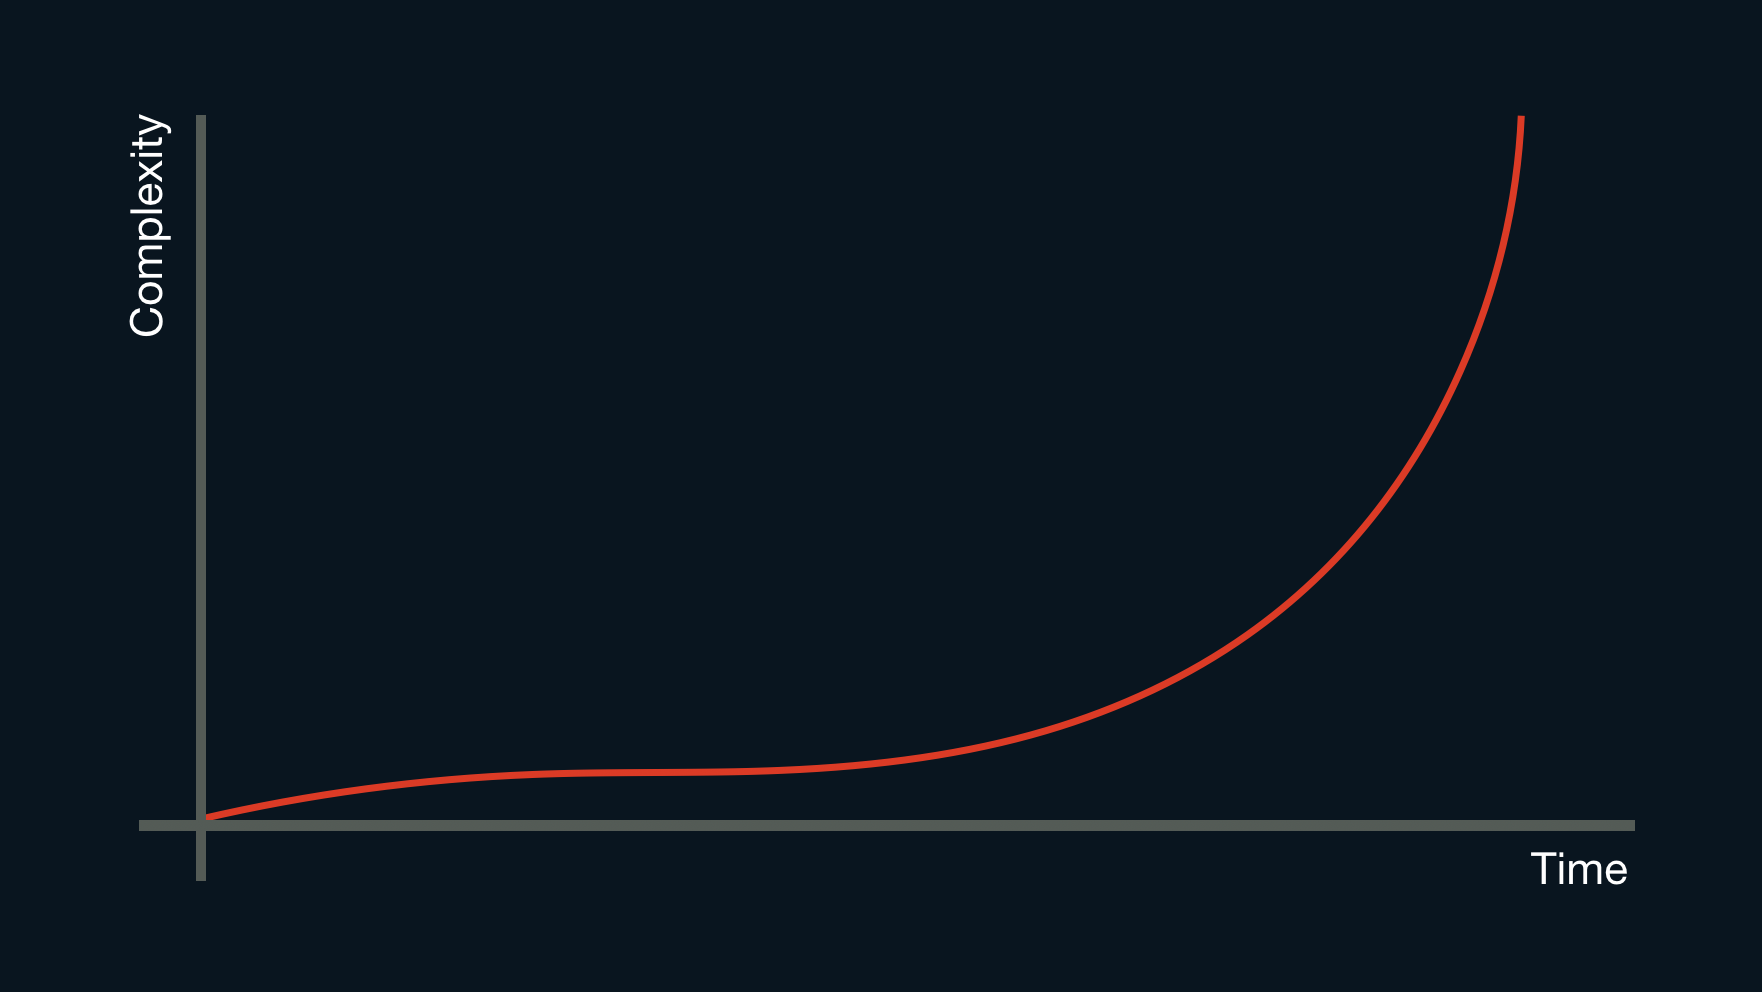
A hand-drawn chart showing complexity of a project over time. It shows a complexity curve that rises steeply at the end.

One of the reasons for this steep rise in complexity is there are limits to the type of data that markdown can easily represent. Relationships are one example where static sites struggle. Relationships between pages or collections of assets (such as an image gallery) can only be represented by markdown in inefficient ways. It requires significant preprocessing to resolve anything more complicated than a simple set of tags or categories. If you’ve ever had to do it, you will also know the authoring experience of managing relationships in markdown isn’t ideal.

User-generated content is another area that can cause a steep rise in the complexity of static sites. Adding features like comments, ratings, likes or any other kind of dynamic content will require third-party services — each has its own account that needs to be managed, not to mention that adding third-party scripts can have a negative impact of page performance.

If a service doesn't match your specific requirements, sometimes it’s possible to cobble solutions together using generic platforms like Google Forms or AirTable.

The end result is we've outsourced the database, fragmented the content management experience and stitched together a bundle of compromises. That’s a stark contrast from the initial ease of setting up and deploying a JAMstack site.

Although this complexity curve is not unique to JAMstack projects, adding rich features to markdown-driven sites is far more difficult than we care to admit. What happened!? A lack of complexity was one of the reasons we favored JAMstack in the first place.

We did that thing that web developers do. We moved the complexity from one space into another and congratulated ourselves 😂. Not having complexity on the server-side is good for front-end performance, but there is little incentive to optimize any further once we do this. Ridiculous build times and complicated tool-chains have become an acceptable reality for modern front-end web development.

JAMstack Plus

Before I come across as sounding too critical, I should make it clear that I absolutely love static site generators. I think they are a perfect solution for many simple sites and you should still use them. However, I feel like a simple content management layer that I own and can configure is preferable to:

  • poor content management experiences,
  • complicated integration of third-party services, and
  • inefficient build processes.

I want to combine the benefits of a CMS with static site generators.

And it seems I'm not the only one who has reached this conclusion:

The solution doesn’t need to be another third-party service or require abandoning static sites entirely. You can use a personalized content management layer and unified API to enrich a static site. It might not be as hard as you think.

The first step is to create an API for your site. You can use any headless CMS, but the challenge I’ve had with many options is they make a lot of assumptions about the type of content you want. You might not want the CMS to manage pages and posts, but rather use it to store comments or images. I find this particularly difficult with WordPress. I often feel like I’m forcing a blogging platform to be just the service I need.

The new version of KeystoneJS (Keystone 5) is an excellent alternative to more opinionated content management systems. It's made up of tiny independent components, so you only add the parts you need. This means it doesn’t feel like modifying a blogging platform. Instead it's like creating a personalized mini-CMS and API to work specifically with your site.

I call this approach JAMstack Plus.

To help you get started with this idea I've created two projects:

  1. Supermaya, a starter kit for the static site generator Eleventy.
  2. Keystone JAMstack Plus, a blog enrichment platform.

Introducing Supermaya

The first project I want to share with you is Supermaya, an Eleventy starter kit designed to help add rich features to a blog or website without a complicated build process.
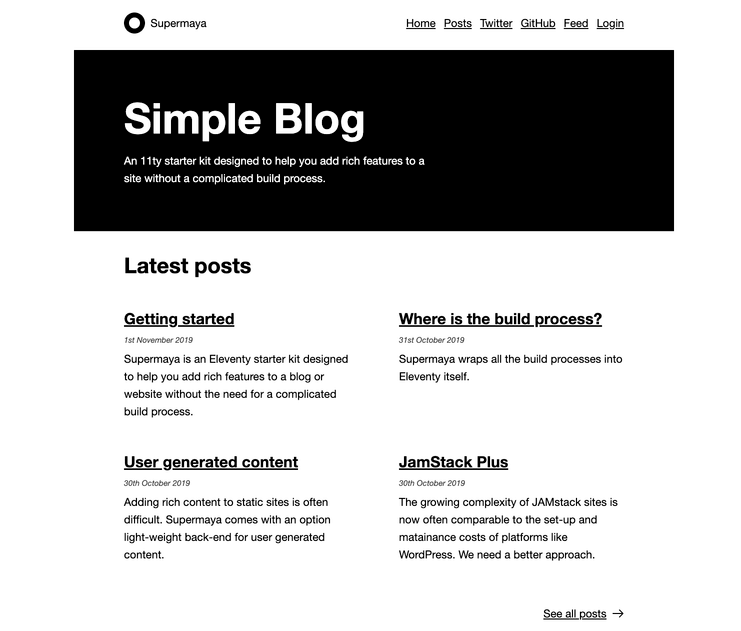
It comes with the all "blog standard" features including:

  • Posts and Pages
  • Pagination
  • Tags
  • RSS feed
  • Service worker
  • Lazy loading images
  • Critical CSS (if enabled)

It also has considerate and accessible markup. If deployed correctly, it should get full scores on a lighthouse audit out-of-the-box:
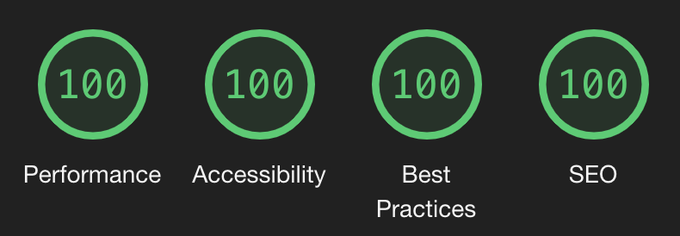
Supermaya scores 100% on Lighthouse tests.

I didn’t build Supermaya specifically as a platform to add user-generated content to static sites. Instead, I started it because I was not satisfied with the way existing static site generators integrate with other build tools. That’s why all the pre-processing steps in Supermaya are built into Eleveny itself. This includes the compilation of SCSS and JavaScript. Unifying the compilation steps eliminates the need for build tools like Grunt, Gulp or Webpack running in parallel.

After this, I realized the other reason for increasing complexity on JAMstack sites was integration with third-party services, usually for user-generated content. To solve this, Supermaya has optional tie-ins with a Keystone JAMstack Plus starter-kit, which makes it easier to add user-generated content and other rich features.

You can deploy both Keystone and Supermaya together and connect them at the same time by following the instructions during installation. This will deploy Keystone to Herouku and Supermaya to Netlify, as well as configure your admin user and API URL.

Rich features are added with progressive enhancement, so if the API cannot be reached or there is a server error, the site will continue to function without noticeable degradation or delays for users.

JAMstack Plus starter kit

The Keystone JAMstack Plus starter kit allows you to add rich features to a blog including:

  • Comments
  • Claps
  • Reading list, and
  • Logins

Just like Supermaya, it can be used on its own. After it’s deployed, you’ll get access to an admin interface that allows you to create and manage content. You’ll also get a GraphQL endpoint that can be connected to Supermaya.

It’s configured with the intention of being a headless CMS for user-generated content. It expects pages and posts to be managed by a static site generator. However, with a little work — and following the examples in Supermaya — you can connect any front-end to the GraphQL API.

I’d encourage you to modify the starter-kit: Add additional features or provide content for pages directly from Keystone. If you add features that could be used by the rest of the community contribute back to the starter-kit and we can make it easier for everyone to add rich features to their sites without the need for third-party services.

Note: The automatic deploy will deploy to a free instance of Heroku. This will sleep periodically if not used which can result in slow API response times after periods of inactivity. You can upgrade to a hobby instance to avoid this.

Consider owning your own data

JAMstack and servers are not incompatible. There’s always a server (usually multiple) — it’s just a question of who owns it. If you are using any kind of third-party service, the chances are they own your account information, your content and collect user data.

Sometimes this might be an acceptable compromise compared with the overhead of deploying and managing a back-end service, but when the complexity of stitching together several APIs becomes comparable to a CMS, I believe managing a tiny configurable service that you own, can provide a better experience for users, developers and content managers. It also provides a solid platform for websites to grow beyond purely static content into more complicated and varying types of applications.

I don’t think JAMstack should defined by pushing all the complexity into the front-end build process or by compromising on developer and user experience. Instead, I think JAMstack should focus on providing lean, configurable static front-ends. These can be connected to APIs to provide user-generated data and content management services. There is no reason not to own and manage these services, if it provides the best outcome.


from CSS-Tricks https://ift.tt/33QMmEu
via IFTTT

Firefox 71: First Out of the Gate With Subgrid

A great release from Firefox this week! See the whole roundup post from Chris Mills. I'm personally stoked to see clip-path: path(); go live, which we've been tracking as it's so clearly useful. We also get column-span: all; which is nice in case you're one of the few taking advantages of CSS columns.

But there are two other things I think are a very big deal:

  1. If you have fluid images (most sites do) via flexible-width containers and img { max-width: 100%; }, you're subject to somewhat janky loading as those images load in because the browser doesn't know how tall the space to reserve needs to be until it knows the dimensions of the image. But now, if you put width/height attributes (e.g. <img width="500" height="250" src="...">), Firefox (and Chrome) will calculate the aspect ratio from those and reserve the correct amount of space. It seems like a small thing, but it really isn't. It will improve the perceived loading for a zillion sites.
  2. Now we've got subgrid! Remember Eric Meyer called them essential years ago. They allow you to have an element share the grid lines of parent elements instead of needing to establish new ones. The result might be less markup flattening and cleaner designs. A grid of "cards" is a great example here, which Miriam covers in this video showing how you can get much more logical space distribution. It must be in the water, as Anton Ball covers the same concept in this post. I'm a fan of how this is progressive-enhancement friendly. You can still set grid columns/rows on an element for browsers that don't support subgrid, but then display: subgrid; to have them inherit lines instead in supporting browsers.

Direct Link to Article — Permalink


from CSS-Tricks https://ift.tt/2PccIeM
via IFTTT

Wednesday, 4 December 2019

Convince Your Boss to Send You to MozCon 2020 (Plus Bonus Letter Template!)

Posted by cheryldraper

It’s that time of year again. Professional development budgets are being distributed and you're daydreaming of Roger hugs and fist bumps. Well, this is a call to arms! It's time to get down to business and convince your boss that you HAVE to go to MozCon 2020.

You're already well acquainted with the benefits of MozCon. Maybe you're a MozCon alumnus. You may have lurked the hashtag once or twice for inside tips and you’ve likely followed the work of some of the speakers for a while. But how are you going to relay that to your boss in a way that sells? Don’t worry, we’ve got a plan.

(And if you want to skip ahead to the letter template, here it is!)

Copy the template

Step #1 - Gather evidence

Alright, so just going in and saying “Rand Fishkin is brilliant and have you seen any of Britney Muller’s Whiteboard Fridays lately?!” probably won’t do the trick — we need some cold hard facts that you can present.

MozCon delivers actionable insights

It’s easy to say that MozCon provides actionable insights, but how do you prove it? A quick scroll through our Facebook Group can prove to anyone that not only is MozCon a gathering of the greatest minds in search, but it also acts as an incubator and facilitator for SEO strategies.

If you can’t get your boss on Facebook, just direct them to the blog post written by Croud: Four things I changed immediately after MozCon. Talk about actionable! A quick Google (or LinkedIn) search will return dozens of similar recaps. Gather a few of these to have in your toolbelt just in case.

Or, if you have the time, pick out some of the event tweets from previous years that relate most to your company. The MozCon hashtag (#MozCon) has plenty of tweets to choose from — things like research findings, workflows, and useful tools are all covered. Some of our favorites from last year are listed below.

Attendees are often given access to exclusive tools and betas by the speakers, and that is something you don’t want to miss!

The networking is unbeatable

The potential knowledge gain doesn’t end with keynote speeches. Many of our speakers stick around for the entire conference and host niche- and vertical-specific Birds of a Feather tables over lunch, in addition to attending the networking events. If you find yourself with questions about their strategies, you'll often have the ability to ask them directly.

But the speakers aren’t the only folks worth networking with. We hand-select industry vendors to attend the conference and showcase their products. These vendors are also available for training and showcases throughout the entire conference.

Lastly, your peers! There's no better way to learn than from those who overcome the same obstacles as you. Opportunities for collaboration and peer-to-peer learning are often invaluable (especially those that happen over yummy snacks) and can lead to better workflows, new business, and even exciting partnerships.

Step #2 - Break down the costs

This is where the majority of the conversation will be focused, but fear not, Roger has already done most of the heavy lifting. So let’s cut to the chase. The goal of MozCon isn’t to make money — the goal is to break even and lift up our friends in search.

Top-of-the-line speakers

Every year we work with our speakers to bring cutting-edge content to the stage. You can be sure that the content you’ll be exposed to will set you up for a year of success.

Videos for everyone

While your coworkers won’t be able to enjoy Top Pot doughnuts or KuKuRuZa popcorn, they will be able to see all of the talks via professional video and audio. Your ticket to MozCon includes a professional video package which allows you (and your whole team) to watch every single talk post-conference, for free. (It's a $350 value for the videos alone!)

Good eats

MozCon doesn’t do anything on-par. We strive to go above and beyond in everything we do, and the food options are no exception. MozCon works with local vendors to ensure there are tasty, sustainable meals for everyone, including those with special diets. From breakfast to lunch and all the snacks in-between, MozCon has you covered (and saves your T&E budget a few bucks, as well).

Swag

Not to brag, but our swag is pretty great. In addition to special MozCon memorabilia, you can look forward to other useful and fun items that vary from year to year. Previous gifts include “conference health” fanny packs (complete with Emergen-C!), moleskin notebooks, reusable water bottles, and phone chargers.

Discounts

This is probably the detail that'll make your boss's ears perk up. There are indeed discounts available for MozCon tickets! If you're buying now through January 31st 2020, Early Bird pricing is in effect, which saves you a cool $200 off regular ticket costs. If you've got a team interested in attending, we offer group discounts for parties of 5+ as well. And my final top-secret tip: if your company already subscribes to a Moz product, you can save even more —up to $700 off per regular-priced ticket if you snag Early Bird pricing, or $500 off after January 31st. That's a real chunk of change!

Step #3 - Be prepared to prove value

It’s important to go into the conference with a plan to bring back value. It’s easy to come to any conference and just enjoy the food and company (especially this one), but it’s harder to take the information gained and implement change.

Make a plan

Before approaching your boss, make sure you have a plan on how you're going to show off all of the insights you gather at MozCon! Obviously, you'll be taking notes — whether it’s to the tune of live tweets, bullet journals, or doodles, those notes are most valuable when they're backed up by action.

Putting it into action

Set expectations with your boss. "After each day, I'll select three takeaways and create a plan on how to execute them." Who could turn down nine potential business-changing strategies?!

And it really isn’t that hard! Especially not with the content that you'll have access to. At the close of each day, we recommend you look back over your notes and do a brain-dump. 

  • How did today's content relate to your business? 
  • Which sessions resonated and would bring the most value to your team? 
  • Which strategies can easily be executed? 
  • Which would make the biggest impact?

After you identify those strategies, create a plan of action that will get you on track for implementing change.

(Fun fact — if you're traveling, this can actually be done on the plane ride home!)

Client briefs

If you have clients on retainer, ongoing training for employees is something those clients should appreciate — it ensures you’re staying ahead of the game. Offer to not only debrief your in-house SEO team, but to also present to your clients. This sort of presentation is a value add that many clients don’t get and can set your business apart.

These presentations can be short blurbs at the beginning of a regular meeting or a chance to gather up all of your clients and enjoy a bit of networking and education.

Still not enough?

Give the boss a taste of MozCon by having them check out some videos from years past to get a taste for the caliber of our speakers. And if you're wanting to break into the speaking circuit, you can also take your shot at securing a community speaker spot onstage. Most years, the call for community speakers opens up in early springtime — keep an eye on the Moz Blog for your chance to pitch!

Lastly, the reviews speak for themselves. MozCon is perfect for SEOs of any level and we even factor in time for you to get a little work done in-between sessions — Vaneese can tell you!

Our fingers are crossed!

Alright friend, now is your time to shine. We've equipped you with some super-persuasive tools and we'll be crossing our fingers that the boss gives you the "okay!" Be sure to grab the letter template and make your case the easy way:

Copy the template

If you can make it, we promise to spoil you to the tune of endless Starbucks coffee, tons of new friends, and an experience that will change your perspective on search. We hope to see your smiling face at MozCon 2020!


Sign up for The Moz Top 10, a semimonthly mailer updating you on the top ten hottest pieces of SEO news, tips, and rad links uncovered by the Moz team. Think of it as your exclusive digest of stuff you don't have time to hunt down but want to read!


from The Moz Blog https://ift.tt/2YigzuJ
via IFTTT

Filtering Lists Dynamically With Vue on the Server Side is Easier Than You’d Think

I recently attended the ARTIFACT conference in Austin, TX, and was inspired by a few talks about accessibility through the lens of site performance. It became clear to me that there is this tendency to rely on big JavaScript frameworks to handle the work — like React, Vue, and Angular — but that can be overkill in some cases. That is, negatively affecting site performance, and thus accessibility. At the same time, these frameworks can make development easier and more efficient for developers. My big takeaway from the conference was to see how a fast, performant experience can be balanced with my own development process.

This was on my mind as I was building a list-filtering feature on a project a few days after the conference. Pretty standard stuff: I needed a list of posts and some category filtering. I was using CraftCMS for front-end routes and templating as well as some Vue components here and there for some added JavaScript juiciness. Not a full-on “single page app” but more like a sprinkle of Vue.

The typical way one might approach this is to:

  1. render the page with an empty div using Craft/Twig
  2. mount a Vue component to that div
  3. make an Ajax call from the Vue component to an API to gather the posts as JSON
  4. render the posts and tie in the filtering.

Since the posts are held as an array within Vue, dynamic list rendering is a pretty cut and dry task.

Simple. Done, right? Well… that extra Ajax request means the user is presented with no content on the initial load depending on the user’s network, which might take some time. We could add a loading indicator, but maybe we can do better?

Preferably, the posts are rendered on the initial page request from the CMS.

But how do we get the static HTML “hooked up” with Vue for the filtering?

After taking a step back to rethink the problem, I realized I could use v-if directives to achieve the same thing with some inline JavaScript from Twig (“in the loop”). Below, I’ll show how I went about it.

My original project used CraftCMS, but I’m going to do the demos below in WordPress. This is just a concept. It can be applied to CraftCMS/Twig or any other CMS/templating engine combo.

First we need a filtering UI. This will likely go above the start of the loop in an archive template.

<?php $terms = get_terms( [
  'taxonomy' => 'post_tag', // I used tags in this example, but any taxonomy would do
  'hide_empty' => true,
  'fields' => 'names'
] );

if(!empty($terms)): ?>
  <div>
    Filter: 
    <ul class="filters">
      <li class="filters__item"><button class="filters__button" :class="{'filters__button--active': tag === ''}" @click="tag = ''">All</button></li>
      <?php foreach($terms as $term): ?>
      <li class="filters__item">
        <button class="filters__button" :class="{'filters__button--active': tag === '<?php echo $term; ?>'}" @click="tag = '<?php echo $term; ?>'"><?php echo $term; ?></button>
      </li>
      <?php endforeach; ?>
    </ul>
    <p aria-live="polite">Showing posts tagged .</p>
  </div>
<?php endif; ?>

Following along with the code, we get some tags from WordPress with get_terms() and output them in a foreach loop. You’ll notice the button for each tag has some Vue directives we’ll use later.

We have our loop!

    <div class="posts">
      <?php
      // Start the Loop.
      while ( have_posts() ) : the_post();
    
        <article id="post-<?php the_ID(); ?>"
          <?php post_class(); ?>
          v-if='<?php echo json_encode(wp_get_post_tags(get_the_ID(),  ['fields' => 'names'])); ?>.includes(tag) || tag === ""'
        >
          <header class="entry-header">
            <h2><?php the_title(); ?></h2>
          </header>    
          <div class="entry-content">
            <?php the_excerpt(); ?>
          </div>        </article>    
      // End the loop.
      endwhile; ?>
    </div>

This is a pretty standard WordPress loop for posts. You’ll notice some Vue directives that make use of PHP outputting CMS content.

Aside from some styling, all that’s left is the Vue “app.” Are you ready for it? Here it is:

new Vue({
  el: '#filterablePosts',
  data: {
    'tag': ''
  }
});

Yes, really, that’s all that’s needed in the JavaScript file to get this to work!

So, what’s going on here?

Well, instead of some JSON array of posts that gets fed into Vue, we output the posts on the initial page load with WordPress. The trick is to use PHP to output what’s needed in the Vue directives: v-if and :class.

What’s happening on the filter buttons is an onclick event handler (@click) that sets the Vue variable “tag” to the value of the WordPress post tag.

@click="tag = '<?php echo $term; ?>'"

Also, if that Vue variable equals the value of the button (in the :class directive), it adds an active class for the button. This is just for styling.

:class="{'filters__button--active': tag === '<?php echo $term; ?>'}"

For the list of articles, we conditionally display them based on the value of the Vue “tag” variable:

v-if='<?php echo json_encode(wp_get_post_tags(get_the_ID(),  ['fields' => 'names'])); ?>.includes(tag) || tag === ""'

The PHP function json_encode allows us to output an array of post tags as JavaScript, which means we can use .includes() to see if the Vue “tag” variable is in that array. We also want to show the article if no tag is selected.

Here it is put together using the Twenty Nineteen theme template archive.php as a base:

<?php get_header(); ?>
  <section id="primary" class="content-area">
    <main id="main" class="site-main">
      <?php if ( have_posts() ) : ?>
        <header class="page-header">
          <?php the_archive_title( '<h1 class="page-title">', '</h1>' ); ?>
        </header>
        <div class="postArchive" id="filterablePosts">
          <?php $terms = get_terms( [
              'taxonomy' => 'post_tag',
              'hide_empty' => true,
              'fields' => 'names'
          ] );

          if(!empty($terms)): ?>
            <div class="postArchive__filters">
              Filter: 
              <ul class="postArchive__filterList filters">
                <li class="filters__item"><button class="filters__button" :class="{'filters__button--active': tag === ''}" @click="tag = ''" aria-controls="postArchive__posts">All</button></li>
  
                <?php foreach($terms as $term): ?>
                  <li class="filters__item">
                    <button class="filters__button" :class="{'filters__button--active': tag === '<?php echo $term; ?>'}" @click="tag = '<?php echo $term; ?>'" aria-controls="postArchive__posts"><?php echo $term; ?></button>
                  </li>
                <?php endforeach; ?>
  
              </ul>
  
              <p aria-live="polite">Showing  posts tagged .</p>
            </div>
          <?php endif; ?>

            <div class="postArchive__posts">
              <?php
              // Start the Loop.
              while ( have_posts() ) : the_post(); ?>
                <article
                  id="post-<?php the_ID(); ?>"
                  <?php post_class(); ?>
                  v-if='<?php echo json_encode(wp_get_post_tags(get_the_ID(), ['fields' => 'names'])); ?>.includes(tag) || tag === ""'
                >
                  <header class="entry-header">
                    <h2><?php the_title(); ?></h2>
                  </header>        
                  <div class="entry-content">
                      <?php the_excerpt(); ?>
                  </div>
                </article>              <?php endwhile; // End the loop. ?>
          </div>
        </div>       
      <?php
      // If no content, include the "No posts found" template.
      else :
        get_template_part( 'template-parts/content/content', 'none' );
      endif; ?>
    </main>  </section>
<?php
get_footer();

Here’s a working example on CodePen

See the Pen
Dynamic List Filtering in Vue using Server-side data fetching
by Dan Brellis (@danbrellis)
on CodePen.

Bonus time!

You may have noticed that I added in an aria-live="polite" notifier below the filter button list to let assistive tech users know the content has changed.

<p aria-live="polite">Showing  posts tagged .</p>

To get the postCount Vue variable, we add some extra JavaScript to our Vue component:

new Vue({
  el: '#filterablePosts',
  data: {
    'tag': '',
    'postCount': ''
},
  methods: {
    getCount: function(){
      let posts = this.$el.getElementsByTagName('article');
      return posts.length;
  }
  },
  beforeMount: function(){
    this.postCount = this.getCount();
  },
  updated: function(){
    this.postCount = this.getCount();
  }
});</p>

The new method getCount is used to select the article elements in our component div and return the length. Before the Vue component mounts we get the count to add to our new Vue postCount variable. Then, when the component updates after the user selects a tag, we get the count again and update our variable.


from CSS-Tricks https://ift.tt/2sMz2UH
via IFTTT

WhoCanUse

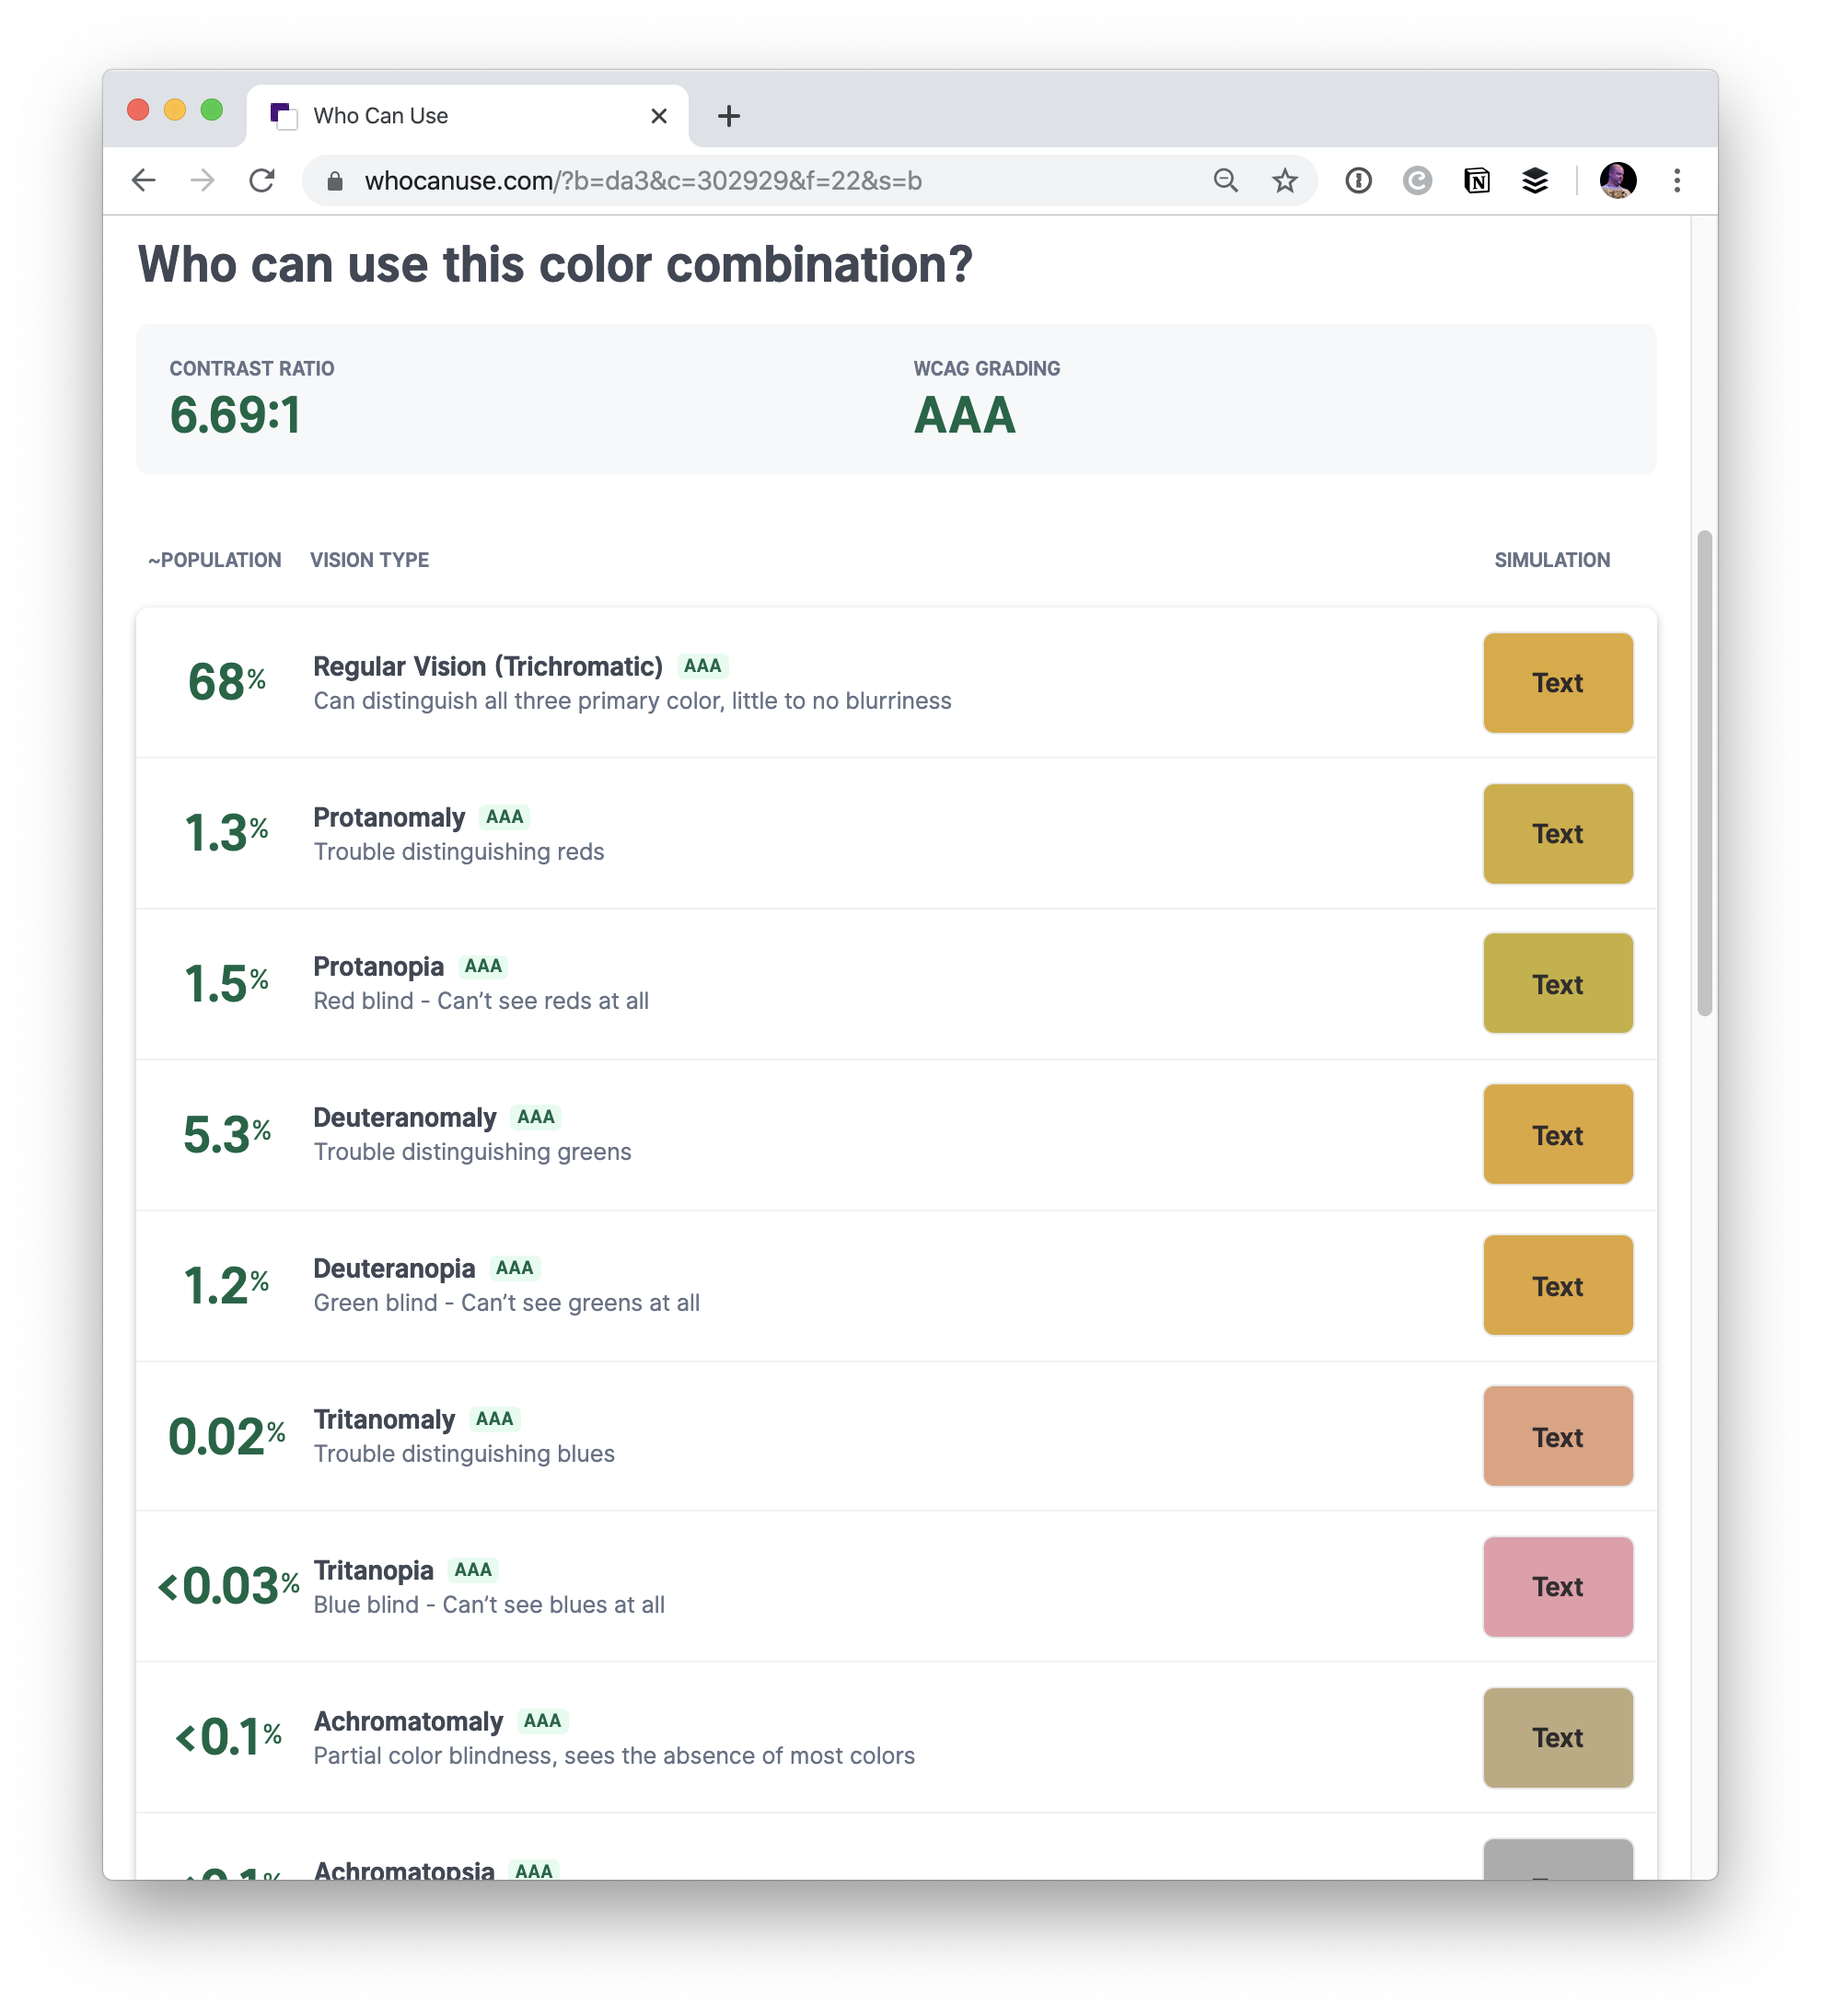
There are loads of microsites and developer tools for looking at color accessibility, including tools built right into browser DevTools. They often show you if a color passes AA or AAA WCAG guidelines. But color contrast is more complicated than that because there is a wide variety of vision impairments.

This site from Corey Ginnivan takes two colors and then shows you a simulation of different vision types (e.g. Tritanomaly, trouble distinguishing blues) and whether the colors still pass OK. It situational events, like whether a screen is in direct sunlight.

Direct Link to Article — Permalink

The post WhoCanUse appeared first on CSS-Tricks.


from CSS-Tricks https://ift.tt/2L3oS8j
via IFTTT

The New Klim Type Website is Impossibly Lovely

I’ve spent the last hour hunched over the new Klim Type foundry website with my arms outstretched as if it was a fire in a very dark cave. Klim Type makes and sells wondrous fonts — like Tiempos, and National 2 or Pitch — and this fresh redesign now showcases them in all their glory. Here’s an example of the type specimen from the Calibre typeface:

There’s a shocking amount of beautiful design in this little website and I particularly like the blog where Kris Sowersby recently wrote a wonderful essay about the design of their latest type release, Söhne, which looks into the design of the New York subway signage, too:

Direct Link to Article — Permalink

The post The New Klim Type Website is Impossibly Lovely appeared first on CSS-Tricks.


from CSS-Tricks https://klim.co.nz/
via IFTTT

Tuesday, 3 December 2019

Dark Mode Favicons

Oooo! A bonafide trick from Thomas Steiner. Chrome will soon be supporting SVG favicons (e.g. <link rel="icon" href="/icon.svg">). And you can embed CSS within an SVG with a <style> element. That CSS can use a perfers-color-sceme media query, and as a result, a favicon that supports dark mode!

<svg width="100" height="100" xmlns="http://www.w3.org/2000/svg">
  <style>
    circle {
      fill: yellow;
      stroke: black;
      stroke-width: 3px;
    }
    @media (prefers-color-scheme: dark) {
      circle {
        fill: black;
        stroke: yellow;
      }
    }
  </style>
  <circle cx="50" cy="50" r="47"/>
</svg>

Safari also supports SVG, but it's different...

<link rel="mask-icon" href="/favicon.svg" color="#990000">

You specify the color, so there is no opportunity there for a dark mode situation. A little surprising, since Apple is so all-in on this dark mode stuff. I have no idea if they plan to address that or what.

The post Dark Mode Favicons appeared first on CSS-Tricks.


from CSS-Tricks https://ift.tt/2RhzRPG
via IFTTT

Passkeys: What the Heck and Why?

These things called  passkeys  sure are making the rounds these days. They were a main attraction at  W3C TPAC 2022 , gained support in  Saf...