Not long ago, I posted about PHP templating in just PHP (which is basically HEREDOC syntax). I'm literally using that technique for some super basic templating I needed to do on this very WordPress site. The main pushback was that this kind of thing can be an XSS vulnerability. In my case, it's not, because I'm not using it for anything other than an abstraction convenience for my own hand-written strings.
Since then, we've had a couple of good articles about templating and I've seen some other approaches. I thought I'd make a quick link dump of them.
Chris Geelhoed took a different approach than I did, passing data to a functio then using a require statement for a template file that expects global variables you set right before the require.
If you're into the idea of using Twig as a PHP templating engine on your WordPress site, check out Timber. TJ Fogarty has written about this for us.
If Timber is a little heavy-handed, check out Sprig from Russell Heimlich. I really like this approach!
A standard e-commerce site has a few common pages. There are product pages, shop pages that list products, and let’s not forget pages for the user account, checkout flow and cart.
WooCommerce makes it a trivial task to set these up on a WordPress site because it provides templates for them and create the pages for you right out of the box. This is what makes it easy to get your store up and running in a few minutes just by setting up some products and your payment processing details. WooCommerce is very helpful that way.
But this isn’t a post extolling the virtues of WooCommerce. Instead, let’s look at how we can customize parts of it. Specifically, I want to look at the cart. WooCommerce is super extensible in the sense that it provides a ton of filters and actions that can be hooked into, plus a way to override the templates in a WordPress theme. The problem is, those take at least some intermediate-level dev chops which may not be feasible for some folks. And, at least in my experience, the cart page tends to be the most difficult to grok and customize.
Let’s look at how to change the WooCommerce cart page by implementing a different layout. This is how a standard default cart page looks:
We’ll go for something like this instead:
Here’s what’s different:
We’re adopting a two-column layout instead of the single full-width layout of the default template. This allows us to bring the “Cart totals” element up top so it is more visible on larger screens.
We’re adding some reassurance for customers by including benefits below the list of products in the cart. This reminds the customer the value they’re getting with their purchase, like free shipping, easy exchanges, customer support and security.
We’re including a list of frequently asked questions beneath the list of products in an accordion format. This helps the customer get answers to questions about their purchase without have to leave and contact support.
This tutorial assumes that you have access to your theme files. If you don’t feel comfortable logging in to your hosting server and going to the file manager, I would suggest you install the plugin WP File Manager. With just the free version, you can accomplish everything explained here.
First, let’s roll our own template
One of the many benefits of WooCommerce is that it gives us pre-designed and coded templates to work with. The problem is that those template files are located in the plugin folder. And if the plugin updates in the future (which it most certainly will), any changes we make to the template will get lost. Since directly editing plugin files is a big ol’ no-no in WordPress, WooCommerce lets us modify the files by making copies of them that go in the theme folder.
It’s a good idea to use a child theme when making these sorts of changes, especially if you are using a third-party theme. That way, any changes made to the theme folder aren’t lost when theme updates are released.
To do this, we first have to locate the template we want to customize. That means going into the site’s root directory (or wherever you keep your site files if working locally, which is a great idea) and open up the /wp-content where WordPress is installed. There are several folders in there, one of which is /plugins. Open that one up and then hop over to the /woocommerce folder. That’s the main directory for all-things-WooCommerce. We want the cart.php file, which is located at:
Let’s open up that file in a code editor. One of the first things you’ll notice is a series of comments on top of the file:
/**
 * Cart Page
 *
 * This template can be overridden by copying it to yourtheme/woocommerce/cart/cart.php. // highlight
 *
 * HOWEVER, on occasion WooCommerce will need to update template files and you
 * (the theme developer) will need to copy the new files to your theme to
 * maintain compatibility. We try to do this as little as possible, but it does
 * happen. When this occurs the version of the template file will be bumped and
 * the readme will list any important changes.
 *
 * @see     https://docs.woocommerce.com/document/template-structure/
 * @package WooCommerce/Templates
 * @version 3.8.0
 */
The highlighted line is exactly what we’re looking for — instructions on how to override the file! How kind of the WooCommerce team to note that up front for us.
Let’s make a copy of that file and create the file path they suggest in the theme:
Drop the copied file there and we’re good to start working on it.
Next, let’s add our own markup
The first two things we can tackle are the benefits and frequently asked questions we identified earlier. We want to add those to the template.
Where does our markup go? Well, to make the layout look the way we laid it out at the beginning of this post, we can start below the cart’s closing table </table> , like this:
We won’t cover the specific HTML that makes these elements. The important thing is knowing where that markup goes.
Once we’ve done that, we should end up with something like this:
Now we have all the elements we want on the page. All that’s left is to style things up so we have the two-column layout.
Alright, now we can override the CSS
We could’ve add more markup to the template to create two separate columns. But the existing markup is already organized nicely in a way that we can accomplish what we want with CSS… thanks to flexbox!
The first step involves making the .woocommerce element a flex container. It’s the element that contains all our other elements, so it makes for a good parent. To make sure we’re only modifying it in the cart and not other pages (because other templates do indeed use this class), we should scope the styles to the cart page class, which WooCommerce also readily makes available.
We have two child elements in the .woocommerce element, perfect for our two-column layout: .woocommerce-cart-form and .cart-collaterals. This is the CSS we need to split things up winds up looking something like this:
/* The table containing the list of products and our custom elements */
.woocommerce-cart .woocommerce-cart-form {
  flex: 1 0 70%; /* 100% at small screens; 70% on larger screens */
  margin-right: 30px;
}

/* The element that contains the cart totals */
.woocommerce-cart .cart-collaterals {
  flex: 1 0 30%; /* 100% at small screens; 30% on larger screens */
  margin-left: 30px;
}

/* Some minor tweak to make sure the cart totals fill the space */
.woocommerce-cart .cart-collaterals .cart_totals {
  width: 100%;
  padding: 0 20px 70px;
}
That gives us a pretty clean layout:
It looks more like Amazon’s cart page and other popular e-commerce stores, which is not at all a bad thing.
Best practice: Make the most important elements stand out
One of the problems I have with WooCommerce’s default designs is that all the buttons are designed the same way. They’re all the same size and same background color.
Look at all that blue!
There is no visual hierarchy on the action users should take and, as such, it’s tough to distinguish, say, how to update the cart from proceeding to checkout. The next thing we ought to do is make that distinction clearer by changing the background colors of the buttons. For that, we write the following CSS:
/* The "Apply Coupon" button */
.button[name="apply_coupon"] {
  background-color: transparent;
  color: #13aff0;
}
/* Fill the "Apply Coupon" button background color and underline it on hover */
.button[name="apply_coupon"]:hover {
  background-color: transparent;
  text-decoration: underline;
}


/* The "Update Cart" button */
.button[name="update_cart"] {
  background-color: #e2e2e2;
  color: #13aff0;
}
/* Brighten up the button on hover */
.button[name="update_cart"]:hover {
  filter: brightness(115%);
}
This way, we create the following hierarchy:
The “Proceed to checkout” is pretty much left as-is, with the default blue background color to make it stand out as it is the most important action in the cart.
The “Update cart” button gets a grey background that blends in with the white background of the page. This de-prioritizes it.
The “Apply coupon” is less a button and more of a text link, making it the least important action of the bunch.
The full CSS that you have to add to make this design is here:
Not too bad, right? It’s nice that WooCommerce makes itself so extensible, but without some general guidance, it might be tough to know just how much leeway you have to customize things. In this case, we saw how we can override the plugin’s cart template in a theme directory to future-proof it from future updates, and how we can override styles in our own stylesheet. We could have also looked at using WooCommerce hooks, the WooCommerce API, or even using WooCommerce conditions to streamline customizations, but perhaps those are good for another post at another time.
In the meantime, have fun customizing the e-commerce experience on your WordPress site and feel free to spend a little time in the WooCommerce docs — there are lots of goodies in there, including pre-made snippets for all sorts of things.
Over a decade ago, I did a little three-part video series on Designing for WordPress. Then I did other series with the same spirit, like videocasting the whole v10 redesign, a friend's website, and even writing a book. Those are getting a little long in the tooth though. You might still learn from watching them if you're getting into WordPress theme development, but there will be moments that feel very aged (old UI's and old versions of software). All the code still works though, because WordPress is great at backward compatibility. I still hear from people who found those videos very helpful for them.
But since time has pressed on, and I was recently asked what resources I would suggest now, I figured I'd have a look around and see what looks good to me.
Do you like how I plopped the WordPress logo over some stock art I bought that features both a computer and a chalkboard, by which to evoke a feeling of "learning"? So good. I know.
Who are we talking to?
There's a spectrum of WordPress developers, from people who don't know any code at all or barely touch it, to hardcore programming nerds building custom everything.
Pick out a theme that looks good, use it.
🤷♂️
🤷♂️
🤷♂️
🤷♂️
Hardcore programmer nerd.
I can't speak to anybody on either edge of that spectrum. There is this whole world of people in the middle. They can code, but they aren't computer science people. They are get the job done people. Maybe it's something like this:
Pick out a theme that will work, use it.
Start with a theme, customize it a bit using built-in tools.
Start with a theme, hack it up with code to do what you need it to do.
Start from scratch, build out what you need.
Start from scratch, build a highly customized site.
Hardcore programmer nerd.
I've always been somewhere around #4, and I think that's a nice sweet spot. I try to let off-the-shelf WordPress and big popular plugins do the heavy lifting, but I'll bring-my-own front-end (HTML, CSS, and JavaScript) and customize what I have to. I'm making templates. I'm writing queries. I'm building blocks. I'm modularizing where I can.
I feel powerful in that zone. I can build a lot of sites that way, almost by myself. So where are the resources today that help you learn this kind of WordPress theme development? Lemme see what I can find.
Wing it, old school
There is something to be said for learning by doing. Trial by fire. I've learned a lot under these circumstances in my life.
The trick here is to get WordPress installed on a live server and then play with the settings, plugins, customizer, and edit the theme files themselves to make the site do things. You'll find HTML in those theme files — hack it up! You'll see PHP code spitting out content. Can you tell what and how to manipulate it? You'll find a CSS file in the theme — edit that sucker!
Editing a WordPress theme and seeing what happens
The official documentation can help you somewhat here:
To some degree, I'm a fan of doing it live (on a production website) because it lends a sense of realness to what you are doing when you are a beginner. The stakes are high there, giving you a sense of the power you have. When I make these changes, they are for anyone in the world with an internet connection to see.
I did this in my formative years by buying a domain name and hosting, installing WordPress on that hosting, logging into it with SFTP credentials, and literally working on the live files. I used Coda, which is still a popular app, and is being actively developed into a new version of itself as I write.
This is Nova, a MacOS code editor from Panic that has SFTP built-in.
Hopefully, the stakes are real but low. Like you're working on a pet project or your personal site. At some point, hacking on production sites becomes too dangerous of an idea. One line of misplaced PHP syntax can take down the entire site.
If you're working on something like a client site, you'll need to upgrade that workflow.
Modern winging it
The modern, healthy, standard way for working on websites is:
Work on them locally.
Use version control (Git), where new work is done in branches of the master branch.
Deployment to the production website is done when code is pushed to the master branch, like your development branch is merged in.
My web hosting is also Flywheel, but that isn't required. It could be anything that gives you SFTP access and runs what WordPress needs: Apache, PHP, and MySQL. Disclosure, Flywheel is a sponsor here, but because I like them and their service :).
Code is hosted on a private repo on GitHub.
Deployment to the Flywheel hosting is done by Buddy. Buddy watches for pushes to the master branch and moves the files over SFTP to the production site.
Local by Flywheel
Now that you have a local setup, you can go nuts. Do whatever you want. You can't break anything on the live site, so you're freer to make experimental changes and just see what happens.
When working locally, it's likely you'll be editing files with a code editor. I'd say the most popular choice these days is the free VS Code, but there is also Atom and Sublime, and fancier editors like PhpStorm.
The freedom of hacking on files is especially apparent once you've pushed your code up to a Git repo. Once you've done that, you have the freedom of reverting files back to the state of the last push.
I use the Git software Tower, and that lets me can see what files have changed since I last committed code. If I've made a mistake, caused a problem, or done something I don't like — even if I don't remember exactly what I changed — I can discard those changes back to their last state. That's a nice level of freedom.
When I do commit code, to master or by merging a branch into master, that's when Buddy kicks in and deploys the changes to the production site.
CSS-Tricks itself is a WordPress site, which has continuously evolved over 13 years.
But like, where do you start?
We're talking about WordPress theme development here, so you start with a theme. Themes are literally folders of files in your WordPress installation.
root
  - /wp-content/
    - /themes/
       - /theme-name/
WordPress comes with some themes right out of the box. As I write, the Twenty Twenty theme ships with WordPress, and it's a nice one! You could absolutely start your theme hackin' on that.
Themes tend to have some opinions about how they organize themselves and do things, and Twenty Twenty is no different. I'd say, perhaps controversially, that there is no one true way to organize your theme, so long as it's valid code and does things the "WordPress" way. This is just something you'll have to get a feel for as you make themes.
Starter themes
Starter themes were a very popular way to start building a theme from scratch in my day. I don't have a good sense if that's still true, but the big idea was a theme with all the basic theme templates you'll need (single blog post pages, a homepage, a 404 page, search results page, etc.) with very little markup and no styling at all. That way you have an empty canvas from which to build out all your HTML, CSS, and JavaScript yourself to your liking. Sorta like you're building any other site from scratch with these core technologies, only with some PHP in there spitting out content.
There was a theme called Starkers that was popular, but it's dead now. I made one called BLANK myself but haven't touched that in a long time. In looking around a bit, I found some newer themes with this same spirit. Here's the best three I found:
I can't personally vouch for them, but they've all been updated somewhat recently and look like pretty good starting points to me. I'd give them a shot in the case that I was starting from absolute scratch on a project. I'd be tempted to download one and then spruce it up exactly how I like it and save that as my own starter in case I needed to do it again.
It feels worth mentioning that a lot of web development isn't starting from scratch, but rather working on existing projects. In that case, the process is still getting a local environment set up; you just aren't starting from scratch, but with the existing theme. I'd suggest duplicating the theme and changing the name while you hack on it, so even if you deploy it, it doesn't affect the live theme. Others might suggest using the starter as a "parent" theme, then branching off into a "child" theme.
To get your local development environment all synced up with exactly what the production website is like, I think the best tool is WP DB Migrate Pro, which can yank down the production database to your local site and all the media files (paid product and a paid add-on, worth every penny).
Fancier Starter Themes
Rather than starting from absolute scratch, there are themes that come with sensible defaults and even modern build processes for you start with. The idea is that building a site with essentially raw HTML, CSS, and JavaScript, while entirely doable, just doesn't have enough modern conveniences to be comfortable.
Here are some.
Morten Rand-Hendriksen has a project called WP Rig that has all sorts of developer tools built into it. A Gulp-based build process spins up a BrowserSync server for auto updating. JavaScript gets processed in Babel. CSS gets processed in PostCSS, and code is linted. He teaches WordPress with it.
Roots makes a theme called Sage that comes with a templating engine, your CSS framework of choice, and fancy build process stuff.
Ignition has a build process and all sorts of helpers.
Timber comes with a templating engine and a bunch of code helpers.
I think all these are pretty cool, but are also probably not for just-starting-out beginner developers.
Books
This is tough because of how many there are. In a quick Google search, I found one site selling fifteen WordPress books as a bundle for $9.99. How would you even know where to start? How good can they be for that rock bottom price? I dunno.
A lot of other books specifically about WordPress theme development are just fairly old. 2008-2015 stuff. Again, not that there isn't anything to be learned there, especially as WordPress doesn't change that rapidly, but still, I'd want to read a book more recent that half a decade old. Seems like a big opportunity for a target audience as large as WordPress users and developers. Or if there is already stuff that I'm just not finding, lemme know in the comments.
Perhaps learning is shifting so much toward online that people don't write books as much...
Online learning courses
Our official learning partner Frontend Masters has one course on WordPress focused on JavaScript and WordPress, so that might not be quite perfect for learning the basics of theme development. Still, fascinating stuff.
Here's some others that looked good to me while looking around:
Zac's course looks like the most updated and perhaps the best option there.
A totally different direction for theme Development
One way to build a site with WordPress is not to use WordPress themes at all! Instead, you can use the WordPress API to suck data out of WordPress and build a site however the heck you please.
This idea of decoupling the CMS and the front end you build is pretty neat. It's often referred to as using a "headless" CMS. It's not for everyone. (One big reason is that, in a way, it doubles your technical debt.). But it can bring a freedom to both the CMS and the front end to evolve independently.
Think of building sites with Gatsby as an hourglass shape.
Gatsby itself is right in the middle. The wide funnel at the top represents the fact that Gatsby can take in data from all sorts of sources. The data could be in markdown files, from a headless CMS or some other API, from a hosted database, or pretty much whatever.
The wide funnel at the bottom represents that the output from Gatsby is static files, so those files can go anywhere. Netlify, GitHub Pages, ZEIT, S3, whatever.
Gatsby does a bunch of neat stuff (just the fact that it's in React I'm sure is appealing to a wide swath of developers), but it seems to me the secret sauce is how it works with any data source.
If you were going to widen that hourglass shape into a, uhhh, pipe, you'd build a tool that connects arbitrary data sources with arbitrary static site generators. It appears that is what Stackbit is doing with Sourcebit. It has a two-sided plugin model (Sources: e.g. Contentful or Sanity; Targets: e.g. Jekyll or Hugo) with the goal of contacting any data source with any site-building tool that needs that data.
I would think contributors to all projects in both the data source and site builder arenas would be interested in seeing this succeed, including Gatsby.
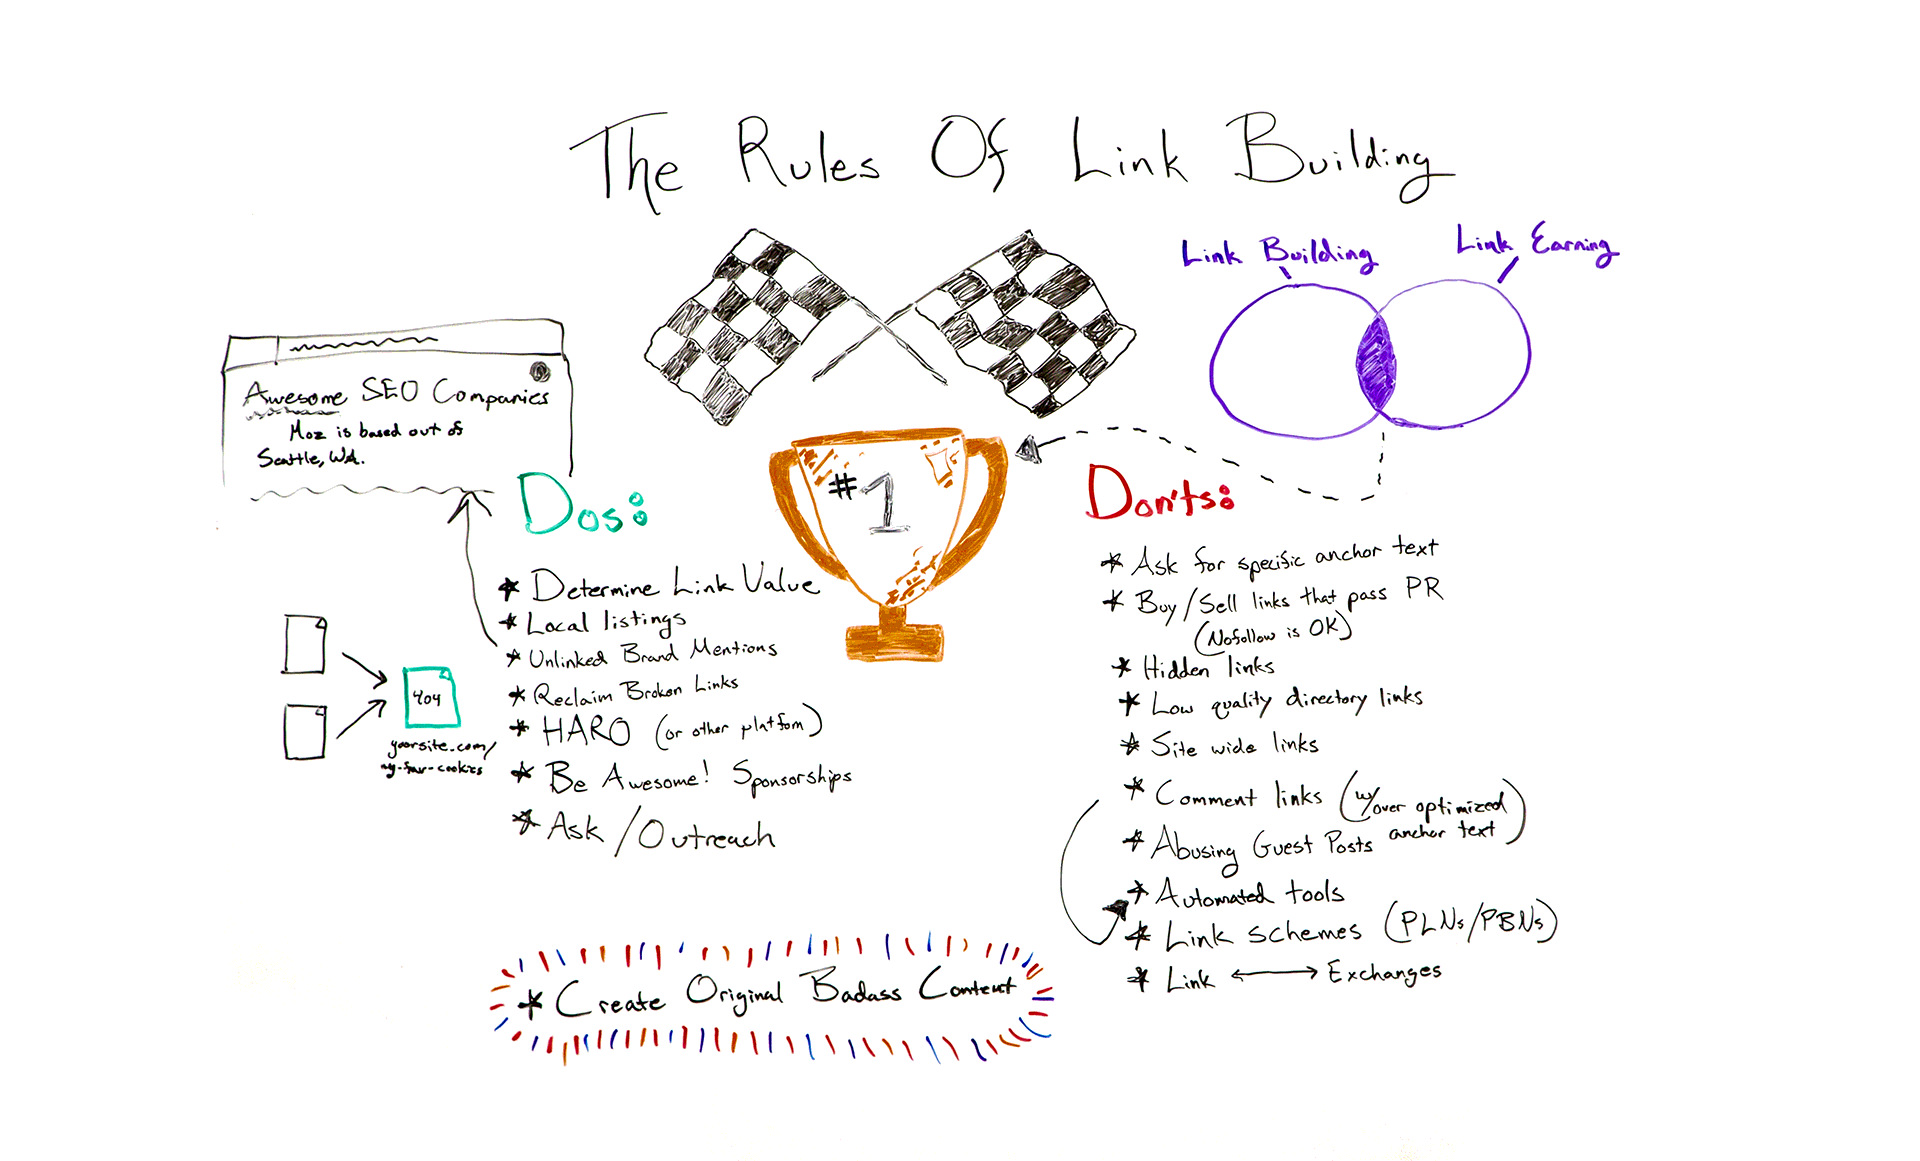
Are you building links the right way? Or are you still subscribing to outdated practices? Britney Muller clarifies which link building tactics still matter and which are a waste of time (or downright harmful) in one of our very favorite classic episodes of Whiteboard Friday.
Click on the whiteboard image above to open a high-resolution version in a new tab!
Video Transcription
Happy Friday, Moz fans! Welcome to another edition of Whiteboard Friday. Today we are going over the rules of link building. It's no secret that links are one of the top three ranking factors in Google and can greatly benefit your website. But there is a little confusion around what's okay to do as far as links and what's not. So hopefully, this helps clear some of that up.
The Dos
All right. So what are the dos? What do you want to be doing? First and most importantly is just to...
I. Determine the value of that link. So aside from ranking potential, what kind of value will that link bring to your site? Is it potential traffic? Is it relevancy? Is it authority? Just start to weigh out your options and determine what's really of value for your site. Our own tool, Moz Link Explorer, can
II. Local listings still do very well. These local business citations are on a bunch of different platforms, and services like Moz Local or Yext can get you up and running a little bit quicker. They tend to show Google that this business is indeed located where it says it is. It has consistent business information — the name, address, phone number, you name it. But something that isn't really talked about all that often is that some of these local listings never get indexed by Google. If you think about it, Yellowpages.com is probably populating thousands of new listings a day. Why would Google want to index all of those?
So if you're doing business listings, an age-old thing that local SEOs have been doing for a while is create a page on your site that says where you can find us online. Link to those local listings to help Google get that indexed, and it sort of has this boomerang-like effect on your site. So hope that helps. If that's confusing, I can clarify down below. Just wanted to include it because I think it's important.
III. Unlinked brand mentions. One of the easiest ways you can get a link is by figuring out who is mentioning your brand or your company and not linking to it. Let's say this article publishes about how awesome SEO companies are and they mention Moz, and they don't link to us. That's an easy way to reach out and say, "Hey, would you mind adding a link? It would be really helpful."
IV. Reclaiming broken links is also a really great way to kind of get back some of your links in a short amount of time and little to no effort. What does this mean? This means that you had a link from a site that now your page currently 404s. So they were sending people to your site for a specific page that you've since deleted or updated somewhere else. Whatever that might be, you want to make sure that you 301 this broken link on your site so that it pushes the authority elsewhere. Definitely a great thing to do anyway.
V. HARO (Help a Reporter Out). Reporters will notify you of any questions or information they're seeking for an article via this email service. So not only is it just good general PR, but it's a great opportunity for you to get a link. I like to think of link building as really good PR anyway. It's like digital PR. So this just takes it to the next level.
VI. Just be awesome. Be cool. Sponsor awesome things. I guarantee any one of you watching likely has incredible local charities or amazing nonprofits in your space that could use the sponsorship, however big or small that might be. But that also gives you an opportunity to get a link. So something to definitely consider.
VII. Ask/Outreach. There's nothing wrong with asking. There's nothing wrong with outreach, especially when done well. I know that link building outreach in general kind of gets a bad rap because the response rate is so painfully low. I think, on average, it's around 4% to 7%, which is painful. But you can get that higher if you're a little bit more strategic about it or if you outreach to people you already currently know. There's a ton of resources available to help you do this better, so definitely check those out. We can link to some of those below.
VIII. COBC (create original badass content). We hear lots of people talk about this. When it comes to link building, it's like, "Link building is dead. Just create great content and people will naturally link to you. It's brilliant." It is brilliant, but I also think that there is something to be said about having a healthy mix. There's this idea of link building and then link earning. But there's a really perfect sweet spot in the middle where you really do get the most bang for your buck.
The Don'ts
All right. So what not to do. The don'ts of today's link building world are...
I. Don't ask for specific anchor text. All of these things appear so spammy. The late Eric Ward talked about this and was a big advocate for never asking for anchor text. He said websites should be linked to however they see fit. That's going to look more natural. Google is going to consider it to be more organic, and it will help your site in the long run. So that's more of a suggestion. These other ones are definitely big no-no's.
II. Don't buy or sell links that pass PageRank. You can buy or sell links that have a no-follow attached, which attributes that this is paid-for, whether it be an advertisement or you don't trust it. So definitely looking into those and understanding how that works.
III. Hidden links. We used to do this back in the day, the ridiculous white link on a white background. They were totally hidden, but crawlers would pick them up. Don't do that. That's so old and will not work anymore. Google is getting so much smarter at understanding these things.
IV. Low-quality directory links. Same with low-quality directory links. We remember those where it was just loads and loads of links and text and a random auto insurance link in there. You want to steer clear of those.
V. Site-wide links also look very spammy. Site-wide being whether it's a footer link or a top-level navigation link, you definitely don't want to go after those. They can appear really, really spammy. Avoid those.
VI. Comment links with over-optimized anchor link text, specifically, you want to avoid. Again, it's just like any of these others. It looks spammy. It's not going to help you long-term. Again, what's the value of that overall? So avoid that.
VII. Abusing guest posts. You definitely don't want to do this. You don't want to guest post purely just for a link. However, I am still a huge advocate, as I know many others out there are, of guest posting and providing value. Whether there be a link or not, I think there is still a ton of value in guest posting. So don't get rid of that altogether, but definitely don't target it for potential link building opportunities.
VIII. Automated tools used to create links on all sorts of websites. ScrapeBox is an infamous one that would create the comment links on all sorts of blogs. You don't want to do that.
IX. Link schemes, private link networks, and private blog networks. This is where you really get into trouble as well. Google will penalize or de-index you altogether. It looks so, so spammy, and you want to avoid this.
X. Link exchange. This is in the same vein as the link exchanges, where back in the day you used to submit a website to a link exchange and they wouldn't grant you that link until you also linked to them. Super silly. This stuff does not work anymore, but there are tons of opportunities and quick wins for you to gain links naturally and more authoritatively.
So hopefully, this helps clear up some of the confusion. One question I would love to ask all of you is: To disavow or to not disavow? I have heard back-and-forth conversations on either side on this. Does the disavow file still work? Does it not? What are your thoughts? Please let me know down below in the comments.
Thank you so much for tuning in to this edition of Whiteboard Friday. I will see you all soon. Thanks.
Sign up for The Moz Top 10, a semimonthly mailer updating you on the top ten hottest pieces of SEO news, tips, and rad links uncovered by the Moz team. Think of it as your exclusive digest of stuff you don't have time to hunt down but want to read!
from The Moz Blog https://ift.tt/32DwgPA
via IFTTT
Here’s a great thread by Kevin Powell that's making the rounds. He believes so many folks see CSS as a frustrating and annoying language:
That's just as unintuitive as JS starting to count at 0, but since you learned that and accept it, it's fine.
The real issue isn't with CSS. If you struggle with it, or ever call it unintuitive, it's probably because you don't really understand how CSS is meant to work.
Why do people respect JavaScript or other languages enough to learn them inside-out, and yet constantly dunk on CSS? Well, all this reminds me of what Jeremy Keith wrote a while back when he argued that CSS is simple, but not easy:
Unlike a programming language that requires knowledge of loops, variables, and other concepts, CSS is pretty easy to pick up. Maybe it’s because of this that it has gained the reputation of being simple. It is simple in the sense of “not complex”, but that doesn’t mean it’s easy. Mistaking “simple” for “easy” will only lead to heartache.
I think that’s what’s happened with some programmers coming to CSS for the first time. They’ve heard it’s simple, so they assume it’s easy. But then when they try to use it, it doesn’t work. It must be the fault of the language, because they know that they are smart, and this is supposed to be easy. So they blame the language. They say it’s broken. And so they try to “fix” it by making it conform to a more programmatic way of thinking.
There have been time where I’ve sat down with engineers to pair with them about a tricky layout issue and the CSS is treated as being beneath them — as if the language is somehow too unpredictable to warrant learning and mastering. Perhaps this has something to do with the past, where we’ve spent years fighting the way browsers render things differently. But this is mostly a solved problem. I can’t remember the last time I fought against browsers like that.
Instead, I reckon the biggest issue that engineers face — and the reason why they find it all so dang frustrating — is that CSS forces you to face the webishness of the web. Things require fallbacks. You need to take different devices into consideration, and all the different ways of seeing a website: mobile, desktop, no mouse, no keyboard, etc. Sure, you have to deal with that when writing JavaScript, too, but it’s easier to ignore. You can’t ignore your the layout of your site being completely broken on a phone.
Side note: We have a guide to centering in CSS not because CSS is busted and dumb, but because there’s so many variables to the extent that a simple question like, “How do I center text?” is actually much more complicated than it appears. There’s so much context that’s missed.
This reminds me of one of my favorite blog posts of all time, where Brandon Smith argues that CSS is awesome and we should respect the language and learn how it works under the hood:
CSS is hard because its properties interact, often in unexpected ways. Because when you set one of them, you're never just setting that one thing. That one thing combines and bounces off of and contradicts with a dozen other things, including default things that you never actually set yourself.
One rule of thumb for mitigating this is, never be more explicit than you need to be. Web pages are responsive by default. Writing good CSS means leveraging that fact instead of overriding it. Use percentages or viewport units instead of a media query if possible. Use min-width instead of width where you can. Think in terms of rules, in terms of what you really mean to say, instead of just adding properties until things look right. Try to get a feel for how the browser resolves layout and sizing, and make your changes and additions on top of that judiciously. Work with CSS, instead of against it.
One particular pattern [for loading non-critical CSS] I’ve seen is the preload/polyfill pattern. With this approach, you load any stylesheets as preloads instead, and then use their onload events to change them back to a stylesheet once the browser has them ready.
So you're trying to make your stylesheet more async, but it causes two big problems:
You've kicked up the priority of the downloading higher than any other asset.
You've blocked the HTML parser too (because of the polyfill as an inline script).
Firefox does something fancy to avoid problem #2 in this particular case, but it affects every other browser.
I've never had good luck with fancy techniques to trick the browser into theoretically better downloading/rendering patterns. I'm kind of a stylesheets in the head, scripts at the end of the body kinda guy, but I know the web is a complicated place. In fact, in a quick peek, I see that Jetpack is inserting an inline script into my <head>, so that would affect my loading too, except they load it with an obfuscated type until later scripts execute and change it, probably to avoid this exact problem.
Anyway, Tim's advice:
• If you’re using loadCSS with the preload/polyfill pattern, switch to the print stylesheet pattern instead.
• If you have any external stylesheets that you’re loading normally (that is, as a regular stylesheet link), move any and all inline scripts that you can above it in the markup
• Inline your critical CSS for the fastest possible start render times.
Here’s a fun one. How might we create a set of those cool Matryoshka dolls where they nest inside one another... but in CSS?
I toyed with this idea in my head for a little while. Then, I saw a tweet from CSS-Tricks and the article image had the dolls. I took that as a sign! It was time to put fingers to the keyboard.
Our goal here is to make these fun and interactive, where we can click on a doll to open it up and reveal another, smaller doll. Oh, and stick with just CSS for the functionality. And while we’re at it, let’s replace the dolls with our own character, say a CodePen bear. Something like this:
We won't dwell on making things pretty to start. Let's get some markup on the page and thrash out the mechanics first.
We can’t have an infinite amount of dolls. When we reach the innermost doll, it'd be nice to be able to reset the dolls without having to do a page refresh. A neat trick for this is to wrap our scene in an HTML form. That way we can use an input and set the type attribute to reset to avoid using any JavaScript.
Next, we need some dolls. Or bears. Or something to start with. The key here will be to use the classic checkbox hack and any associated form labels. As a note, I’m going to use Pug to handle the markup because it supports loops, making things a little easier. But, you can certainly write the HTML by hand. Here’s the start with form fields and labels that set up the checkbox hack.
Try clicking some of the inputs and hitting the Reset input. They all become unchecked. Nice, we’ll use that.
We have some interactivity but nothing is really happening yet. Here’s the plan:
We’ll only show one checkbox at a time
Checking a checkbox should reveal the label for the next checkbox.
When we get to the last checkbox, there our only option should be to reset the form.
The trick will be to make use of the CSS adjacent sibling combinator (+).
When a checkbox is checked, we need to show the label for the next doll, which will be three siblings along in the DOM. How do we make the first label visible? Give it an explicit display: block via inline styles in our markup. Putting this together, we have something along these lines:
Clicking each label reveals the next. Hold on, the last label isn’t shown! That’s correct. And that’s because the last label doesn’t have a checkbox. We need to add a rule that caters to that last label.
Cool. We're getting somewhere. That's the basic mechanics. Now things are going to get a little trickier.
Basic styling
So, you might be thinking, “Why aren’t we hiding the checked label?” Good question! But, if we hide it straight away, we won’t have any transition between the current doll and the next. Before we start animating our dolls, let’s create basic boxes that will represent a doll. We can style them up so they mimic the doll outline without the detail.
Clicking one doll instantly reveals the next one and, when we’ve reached the last doll, we can reset the form to start again. That’s what we want here.
The mechanics
We are going to animate the dolls based on a center point. Our animation will consist of many steps:
Slide the current doll out to the left.
Open the doll to reveal the next one.
Move the next doll where the current one started.
Make the current doll fade out.
Assign the next doll as the current doll.
Let’s start by sliding the current doll out to the left. We apply an animation when we click a label. Using the :checked pseudo-selector we can target the current doll. At this point, it’s worth noting that we are going to use CSS variables to control animation speed and behavior. This will make it easier to chain animations on the labels.
Great! Now once we have started, we can’t stop the animation chain from happening.
Next up, we need to crack open the doll to reveal the next one. This is where things get tricky because we are going to need some extra elements, not only to create the effect that the doll is opening up, but also to reveal the next doll inside of it. That's right: we need to duplicate the inner doll. The trick here is to reveal a "fake" doll that we swap for the real one once we've animated it. This also means delaying the reveal of the next label.
Now our markup updates labels so that they contains span elements.
Next is where we can use CSS custom properties to handle changing values. Once the doll has slid over to the left, we can open it. But how do we know how long to delay it from opening until that happens? We can use the --speed custom property we defined earlier to calculate the correct delay.
It looks a little quick if we use the --speed value as it is, so let’s multiply it by two seconds:
Now we need to move the inner “dummy” doll to the new position. This animation is like the open animation in that it consists of three stages. Again, that’s one to move up, one to move right, and one to set down. It's like the slide animation, too. We are going to use CSS custom properties to determine the distance that the doll moves.
:root {
  // Introduce a new variable that defines how high the dummy doll should pop out.
  --pop-height: 60;
}

@keyframes move {
  0% {
    transform: translate(0, 0) translate(0, 0);
  }
  33.333333333333336% {
    transform: translate(0, calc(var(--pop-height) * -1%)) translate(0, 0);
  }
  66.66666666666667% {
    transform: translate(0, calc(var(--pop-height) * -1%)) translate(calc((var(--base-slide) * 1px) + var(--slide-distance) * 1%), 0);
  }
  100% {
    transform: translate(0, calc(var(--pop-height) * -1%)) translate(calc((var(--base-slide) * 1px) + var(--slide-distance) * 1%), calc(var(--pop-height) * 1%));
  }
}
Almost there!
The only thing is that the next doll is available as soon as we click a doll. that means we can spam click our way through the set.
Technically, the next doll shouldn’t show until the “fake” one has moved into place. It’s only once the “fake” doll is in place that we can hide it and reveal the real one. That means we going to use zero-second scale animations! That's right. We can play pretend by delaying two zero-second animations and using animation-fill-mode.
@keyframes appear {
  from {
    transform: scale(0);
  }
}
We actually only need one set of @keyframes. because we can re-use what we have to create the opposite movement with animation-direction: reverse. With that in mind, all our animations get applied something like this:
// The next doll
input:checked + .doll + input + .doll,
// The last doll (doesn't have an input)
input:checked + .doll + .doll {
  animation: appear 0s calc(var(--speed) * 5s) both;
  display: block;
}

// The current doll
input:checked + .doll,
// The current doll that isn't the first. Specificity prevails
input:checked + .doll + input:checked + .doll {
  animation: slideLeft calc(var(--speed) * 1s) forwards;
  pointer-events: none;
}

input:checked + .doll .doll__half--top,
input:checked + .doll + input:checked + .doll .doll__half--top {
  animation: open calc(var(--speed) * 2s) calc(var(--speed) * 1s) forwards;
}

input:checked + .doll .doll__dummy,
input:checked + .doll + input:checked + .doll .doll__dummy {
  animation: move calc(var(--speed) * 2s) calc(var(--speed) * 3s) forwards, appear 0s calc(var(--speed) * 5s) reverse forwards;
}
Note how important the variables are, especially where we are chaining animations. That gets us almost where we need to be.
I can hear it now: "They're all the same size!" Yep. That's the missing piece. They need to scale down. The trick here is to adjust the markup again and make use of CSS custom properties yet again.
We just introduced a CSS custom property inline that tells us the index of the doll. We can use this to generate a scale of each half as well as the fake inner doll. The halves will have to scale to match the actual doll size, but the fake inner doll scale will need to match that of the next doll. Tricky!
We can apply these scales inside the containers so that our animations are not affected.
Here's a demo where the containers have been given a background color to see what’s happening.
We can see that, although the content size changes, they remain the same size. This makes for consistent animation behavior and makes the code easier to maintain.
Finishing touches
Wow, things are looking pretty slick! All we need are some finishing touches and we are done!
The scene starts to look cluttered because we’re stacking the “old” dolls off to the side when a new one is introduced. So let's slide a doll out of view when the next one is revealed to clean that mess up.
The new slideOut animation fades the doll out while it translates to the left. Perfect. 👍
That’s it for the CSS trickery we need to make this effect work. All that’s left style the dolls and the scene.
We have many options to style the dolls. We could use a background image, CSS illustration, SVG, or what have you. We could even throw together some emoji dolls that use random inline hues!
Let’s go with inline SVG.
I’m basically using the same underlying mechanics we’ve already covered. The difference is that I’m also generating inline variables for hue and lightness so the bears sport different shirt colors.
There we have it! Stacking dolls — err, bears — with nothing but HTML and CSS! All the code for all the steps is available in this CodePen collection. Questions or suggestions? Feel free to reach out to me here in the comments.
GraphQL is becoming popular and developers are constantly looking for frameworks that make it easy to set up a fast, secure and scalable GraphQL API. In this article, we will learn how to create a scalable and fast GraphQL API with authentication and fine-grained data-access control (authorization). As an example, we’ll build an API with register and login functionality. The API will be about users and confidential files so we’ll define advanced authorization rules that specify whether a logged-in user can access certain files.
By using FaunaDB’s native GraphQL and security layer, we receive all the necessary tools to set up such an API in minutes. FaunaDB has a free tier so you can easily follow along by creating an account at https://dashboard.fauna.com/. Since FaunaDB automatically provides the necessary indexes and translates each GraphQL query to one FaunaDB query, your API is also as fast as it can be (no n+1 problems!).
Setting up the API is simple: drop in a schema and we are ready to start. So let’s get started!
The use-case: users and confidential files
We need an example use-case that demonstrates how security and GraphQL API features can work together. In this example, there are users and files. Some files can be accessed by all users, and some are only meant to be accessed by managers. The following GraphQL schema will define our model:
When looking at the schema, you might notice that the createUser and loginUser Mutation fields have been annotated with a special directive named @resolver. This is a directive provided by the FaunaDB GraphQL API, which allows us to define a custom behavior for a given Query or Mutation field. Since we’ll be using FaunaDB’s built-in authentication mechanisms, we will need to define this logic in FaunaDB after we import the schema.
Importing the schema
First, let’s import the example schema into a new database. Log into the FaunaDB Cloud Console with your credentials. If you don’t have an account yet, you can sign up for free in a few seconds.
Once logged in, click the "New Database" button from the home page:
Choose a name for the new database, and click the "Save" button:
Next, we will import the GraphQL schema listed above into the database we just created. To do so, create a file named schema.gql containing the schema definition. Then, select the GRAPHQL tab from the left sidebar, click the "Import Schema" button, and select the newly-created file:
The import process creates all of the necessary database elements, including collections and indexes, for backing up all of the types defined in the schema. It automatically creates everything your GraphQL API needs to run efficiently.
You now have a fully functional GraphQL API which you can start testing out in the GraphQL playground. But we do not have data yet. More specifically, we would like to create some users to start testing our GraphQL API. However, since users will be part of our authentication, they are special: they have credentials and can be impersonated. Let’s see how we can create some users with secure credentials!
Custom resolvers for authentication
Remember the createUser and loginUser mutation fields that have been annotated with a special directive named @resolver. createUser is exactly what we need to start creating users, however the schema did not really define how a user needs to created; instead, it was tagged with a @resolver tag.
By tagging a specific mutation with a custom resolver such as @resolver(name: "create_user") we are informing FaunaDB that this mutation is not implemented yet but will be implemented by a User-defined function (UDF). Since our GraphQL schema does not know how to express this, the import process will only create a function template which we still have to fill in.
A UDF is a custom FaunaDB function, similar to a stored procedure, that enables users to define a tailor-made operation in Fauna’s Query Language (FQL). This function is then used as the resolver of the annotated field.
We will need a custom resolver since we will take advantage of the built-in authentication capabilities which can not be expressed in standard GraphQL. FaunaDB allows you to set a password on any database entity. This password can then be used to impersonate this database entity with the Login function which returns a token with certain permissions. The permissions that this token holds depend on the access rules that we will write.
Let’s continue to implement the UDF for the createUser field resolver so that we can create some test users. First, select the Shell tab from the left sidebar:
As explained before, a template UDF has already been created during the import process. When called, this template UDF prints an error message stating that it needs to be updated with a proper implementation. In order to update it with the intended behavior, we are going to use FQL's Update function.
So, let’s copy the following FQL query into the web-based shell, and click the "Run Query" button:
The create_user UDF will be in charge of properly creating a User document along with a password value. The password is stored in the document within a special object named credentials that is encrypted and cannot be retrieved back by any FQL function. As a result, the password is securely saved in the database making it impossible to read from either the FQL or the GraphQL APIs. The password will be used later for authenticating a User through a dedicated FQL function named Login, as explained next.
Now, let’s add the proper implementation for the UDF backing up the loginUser field resolver through the following FQL query:
Copy the query listed above and paste it into the shell’s command panel, and click the "Run Query" button:
The login_user UDF will attempt to authenticate a User with the given username and password credentials. As mentioned before, it does so via the Login function. The Login function verifies that the given password matches the one stored along with the User document being authenticated. Note that the password stored in the database is not output at any point during the login process. Finally, in case the credentials are valid, the login_user UDF returns an authorization token called a secret which can be used in subsequent requests for validating the User’s identity.
With the resolvers in place, we will continue with creating some sample data. This will let us try out our use case and help us better understand how the access rules are defined later on.
Creating sample data
First, we are going to create a manager user. Select the GraphQL tab from the left sidebar, copy the following mutation into the GraphQL Playground, and click the "Play" button:
Now, let’s create a confidential file by running the following mutation:
mutation CreateConfidentialFile {
  createFile(data: {
    content: "This is a confidential file!"
    confidential: true
  }) {
    content
    confidential
  }
}
As a response, you should get the following:
And lastly, create a public file with the following mutation:
mutation CreatePublicFile {
  createFile(data: {
    content: "This is a public file!"
    confidential: false
  }) {
    content
    confidential
  }
}
If successful, it should prompt the following response:
Now that all the sample data is in place, we need access rules since this article is about securing a GraphQL API. The access rules determine how the sample data we just created can be accessed, since by default a user can only access his own user entity. In this case, we are going to implement the following access rules:
Allow employee users to read public files only.
Allow manager users to read both public files and, only during weekdays, confidential files.
As you might have already noticed, these access rules are highly specific. We will see however that the ABAC system is powerful enough to express very complex rules without getting in the way of the design of your GraphQL API.
Such access rules are not part of the GraphQL specification so we will define the access rules in the Fauna Query Language (FQL), and then verify that they are working as expected by executing some queries from the GraphQL API.
But what is this "ABAC" system that we just mentioned? What does it stand for, and what can it do?
What is ABAC?
ABAC stands for Attribute-Based Access Control. As its name indicates, it’s an authorization model that establishes access policies based on attributes. In simple words, it means that you can write security rules that involve any of the attributes of your data. If our data contains users we could use the role, department, and clearance level to grant or refuse access to specific data. Or we could use the current time, day of the week, or location of the user to decide whether he can access a specific resource.
In essence, ABAC allows the definition of fine-grained access control policies based on environmental properties and your data. Now that we know what it can do, let’s define some access rules to give you concrete examples.
Defining the access rules
In FaunaDB, access rules are defined in the form of roles. A role consists of the following data:
name — the name that identifies the role
privileges — specific actions that can be executed on specific resources
membership — specific identities that should have the specified privileges
Roles are created through the CreateRole FQL function, as shown in the following example snippet:
You can see two important concepts in this role; membership and privileges. Membership defines who receives the privileges of the role and privileges defines what these permissions are. Let’s write a simple example rule to start with: “Any user can read all files.”
Since the rule applies on all users, we would define the membership like this:
membership: {
  resource: Collection("User")
}
Simple right? We then continue to define the "Can read all files" privilege for all of these users.
The direct effect of this is that any token that you receive by logging in with a user via our loginUser GraphQL mutation can now access all files.
This is the simplest rule that we can write, but in our example we want to limit access to some confidential files. To do that, we can replace the {read: true} syntax with a function. Since we have defined that the resource of the privilege is the "File" collection, this function will take each file that would be accessed by a query as the first parameter. You can then write rules such as: “A user can only access a file if it is not confidential”. In FaunaDB’s FQL, such a function is written by using Query(Lambda(‘x’, … <logic that users Var(‘x’)>)).
Below is the privilege that would only provide read access to non-confidential files:
privileges: [
  {
    resource: Collection("File"),
    actions: {
      // Read and establish rule based on action attribute
      read: Query(
        // Read and establish rule based on resource attribute
        Lambda("fileRef",
          Not(Select(["data", "confidential"], Get(Var("fileRef"))))
        )
      )
    }
  }
]
This directly uses properties of the "File" resource we are trying to access. Since it’s just a function, we could also take into account environmental properties like the current time. For example, let’s write a rule that only allows access on weekdays.
As mentioned in our rules, confidential files should only be accessible by managers. Managers are also users, so we need a rule that applies to a specific segment of our collection of users. Luckily, we can also define the membership as a function; for example, the following Lambda only considers users who have the MANAGER role to be part of the role membership.
membership: {
  resource: Collection("User"),
  predicate: Query(    // Read and establish rule based on user attribute
    Lambda("userRef",
      Equals(Select(["data", "role"], Get(Var("userRef"))), "MANAGER")
    )
  )
}
In sum, FaunaDB roles are very flexible entities that allow defining access rules based on all of the system elements' attributes, with different levels of granularity. The place where the rules are defined — privileges or membership — determines their granularity and the attributes that are available, and will differ with each particular use case.
Now that we have covered the basics of how roles work, let’s continue by creating the access rules for our example use case!
In order to keep things neat and tidy, we’re going to create two roles: one for each of the access rules. This will allow us to extend the roles with further rules in an organized way if required later. Nonetheless, be aware that all of the rules could also have been defined together within just one role if needed.
Let’s implement the first rule:
“Allow employee users to read public files only.”
In order to create a role meeting these conditions, we are going to use the following query:
CreateRole({
  name: "employee_role",
  membership: {
    resource: Collection("User"),
    predicate: Query(
      Lambda("userRef",
        // User attribute based rule:
        // It grants access only if the User has EMPLOYEE role.
        // If so, further rules specified in the privileges
        // section are applied next.
        Equals(Select(["data", "role"], Get(Var("userRef"))), "EMPLOYEE")
      )
    )
  },
  privileges: [
    {
      // Note: 'allFiles' Index is used to retrieve the
      // documents from the File collection. Therefore,
      // read access to the Index is required here as well.
      resource: Index("allFiles"),
      actions: { read: true }
    },
    {
      resource: Collection("File"),
      actions: {
        // Action attribute based rule:
        // It grants read access to the File collection.
        read: Query(
          Lambda("fileRef",
            Let(
              {
                file: Get(Var("fileRef")),
              },
              // Resource attribute based rule:
              // It grants access to public files only.
              Not(Select(["data", "confidential"], Var("file")))
            )
          )
        )
      }
    }
  ]
})
Select the Shell tab from the left sidebar, copy the above query into the command panel, and click the "Run Query" button:
Next, let’s implement the second access rule:
“Allow manager users to read both public files and, only during weekdays, confidential files.”
In this case, we are going to use the following query:
CreateRole({
  name: "manager_role",
  membership: {
    resource: Collection("User"),
    predicate: Query(
      Lambda("userRef",
        // User attribute based rule:
        // It grants access only if the User has MANAGER role.
        // If so, further rules specified in the privileges
        // section are applied next.
        Equals(Select(["data", "role"], Get(Var("userRef"))), "MANAGER")
      )
    )
  },
  privileges: [
    {
      // Note: 'allFiles' Index is used to retrieve
      // documents from the File collection. Therefore,
      // read access to the Index is required here as well.
      resource: Index("allFiles"),
      actions: { read: true }
    },
    {
      resource: Collection("File"),
      actions: {
        // Action attribute based rule:
        // It grants read access to the File collection.
        read: Query(
          Lambda("fileRef",
            Let(
              {
                file: Get(Var("fileRef")),
                dayOfWeek: DayOfWeek(Now())
              },
              Or(
                // Resource attribute based rule:
                // It grants access to public files.
                Not(Select(["data", "confidential"], Var("file"))),
                // Resource and environmental attribute based rule:
                // It grants access to confidential files only on weekdays.
                And(
                  Select(["data", "confidential"], Var("file")),
                  And(GTE(Var("dayOfWeek"), 1), LTE(Var("dayOfWeek"), 5))
                )
              )
            )
          )
        )
      }
    }
  ]
})
Copy the query into the command panel, and click the "Run Query" button:
At this point, we have created all of the necessary elements for implementing and trying out our example use case! Let’s continue with verifying that the access rules we just created are working as expected...
Putting everything in action
Let’s start by checking the first rule:
“Allow employee users to read public files only.”
The first thing we need to do is log in as an employee user so that we can verify which files can be read on its behalf. In order to do so, execute the following mutation from the GraphQL Playground console:
As a response, you should get a secret access token. The secret represents that the user has been authenticated successfully:
At this point, it’s important to remember that the access rules we defined earlier are not directly associated with the secret that is generated as a result of the login process. Unlike other authorization models, the secret token itself does not contain any authorization information on its own, but it’s just an authentication representation of a given document.
As explained before, access rules are stored in roles, and roles are associated with documents through their membership configuration. After authentication, the secret token can be used in subsequent requests to prove the caller’s identity and determine which roles are associated with it. This means that access rules are effectively verified in every subsequent request and not only during authentication. This model enables us to modify access rules dynamically without requiring users to authenticate again.
Now, we will use the secret issued in the previous step to validate the identity of the caller in our next query. In order to do so, we need to include the secret as a Bearer Token as part of the request. To achieve this, we have to modify the Authorization header value set by the GraphQL Playground. Since we don’t want to miss the admin secret that is being used as default, we’re going to do this in a new tab.
Click the plus (+) button to create a new tab, and select the HTTP HEADERS panel on the bottom left corner of the GraphQL Playground editor. Then, modify the value of the Authorization header to include the secret obtained earlier, as shown in the following example. Make sure to change the scheme value from Basic to Bearer as well:
With the secret properly set in the request, let’s try to read all of the files on behalf of the employee user. Run the following query from the GraphQL Playground:
In the response, you should see the public file only:
Since the role we defined for employee users does not allow them to read confidential files, they have been correctly filtered out from the response!
Let’s move on now to verifying our second rule:
“Allow manager users to read both public files and, only during weekdays, confidential files.”
This time, we are going to log in as the employee user. Since the login mutation requires an admin secret token, we have to go back first to the original tab containing the default authorization configuration. Once there, run the following query:
Copy the secret, create a new tab, and modify the Authorization header to include the secret as a Bearer Token as we did before. Then, run the following query in order to read all of the files on behalf of the manager user:
As long as you’re running this query on a weekday (if not, feel free to update this rule to include weekends), you should be getting both the public and the confidential file in the response:
And, finally, we have verified that all of the access rules are working successfully from the GraphQL API!
Conclusion
In this post, we have learned how a comprehensive authorization model can be implemented on top of the FaunaDB GraphQL API using FaunaDB's built-in ABAC features. We have also reviewed ABAC's distinctive capabilities, which allow defining complex access rules based on the attributes of each system component.
While access rules can only be defined through the FQL API at the moment, they are effectively verified for every request executed against the FaunaDB GraphQL API. Providing support for specifying access rules as part of the GraphQL schema definition is already planned for the future.
In short, FaunaDB provides a powerful mechanism for defining complex access rules on top of the GraphQL API covering most common use cases without the need for third-party services.