Our tools for vertical alignment have gotten a lot better as of late. My early days as a website designer involved laying out 960px wide homepage designs and aligning things horizontally across a page using a 12-column grid. Media queries came along which required a serious mental shift. It solved some big problems, of course, but introduced new ones, like dealing with alignment when elements wrap or are otherwise moved around in the layout.
Let’s take a look at just one particular scenario: a “bar” with some buttons in it. There are two groups of these buttons, each contained within a <fieldset> with a <legend>.
On a large screen, we’re all set:
And here’s a very basic CSS method that accomplishes that layout, and also breaks down onto two “rows” at a mobile breakpoint:
.accessibility-tools fieldset {
  width: 48%;
  float: left;
  margin-right: 1%;
}


/* Mobile */
@media only screen and (max-width: 480px) {
  .accessibility-tools fieldset {
    width: 100%;
  }
}
On a small screen, we end up with this:
This is the problem: lack of vertical alignment. Let’s say we want to align those buttons into a more pleasing arrangement where the button edges align with each other nicely.
To begin, we could go for fixed-width, pixel-based CSS solutions to force elements to line up nicely at various breakpoints, using magic numbers like this:
/* Mobile */
@media only screen and (max-width: 480px) {
  legend {
    width: 160px;
  }
  button {
    width: 130px;
  }
}
That does the trick.
But… this is not exactly a flexible solution to the problem. Aside from the magic numbers (fixed-pixel values based on specific content), it also relied on the use of media queries which I am trying to move away from when I can. I discussed this in a post called “Stepping away from Sass” on my blog.
As I moved towards some of the more modern features of CSS the need to target specific screen sizes with unique code was removed.
What I need is each button and label to respond to:
the space available
their content
and!
Other elements around them
Available space
The problem with using media queries is that they don’t take into account the space around the elements that are being realigned — a point perfectly demonstrated in this image from “The Flexbox holy albatross” by Heydon Pickering:
What I really want is for the second <fieldset> to wrap under the first only when they can no longer fit neatly on one row.
Can we get this done with flexbox?
A key selling point for flexbox is its ability to create elements that respond to the space around them. Components can “flex” to fill additional space and shrink to fit into smaller spaces.
For this situation, the flex-wrap property is set to wrap. This means as soon as both <fieldset> elements no longer fit on one line, they will wrap onto a second line.
The flex-wrap property has three available values. The default value is nowrap, leaving items on one line. The wrap value allows elements to flow onto multiple lines. Then there’s wrap-reverse, which allows items to wrap but — wait for it — in reverse (it is weird to see: when elements wrap, they go above the previous row in left-to-right situations).
Using flexbox stops the layout from being quite as rigid, but a min-width value is still needed to remove the vertical alignment problem. So: close but no cigar.
Can grid help us?
CSS Grid is the very first CSS module created specifically to solve the ongoing layout problems faced by web designers and developers. It is not a direct replacement for flexbox; rather the two modules usually work pretty well together.
Like flexbox, grid can be used to allow each <fieldset> to occupy as much or as little space as they need. Getting right to it, we can leverage the auto-fill and auto-fit keywords (within a repeat() function) to allow grid items to flow onto multiple lines without the need for media queries. The difference is a bit subtle, but well-explained in “Auto-Sizing Columns in CSS Grid: auto-fill vs auto-fit” by Sara Soueidan. Let’s use auto-fit:
Like the flexbox example, I still need to set an absolute value for the width of the label to align the <fieldset> elements as they stack.
Another approach with grid
CSS Grid also allows elements to respond based on their content using flexible grid tracks. In addition to other length values like percentages, relative units, or pixels, CSS Grid accepts a Fractional Unit (fr), where 1fr will take up one part of the available space, 2fr will take up two parts of the available space, and so on. Let’s set up two equal columns here:
Both of these demos work, and are free from any absolute values or device specific CSS. The results are far from ideal though, each grid now responds at different points. Maybe not a huge problem, but certainly not great.
This happens because when adding display: grid to a container, only the direct children of that container become grid items. This means the intrinsic sizing units we used only relate to elements in the same grid.
Using subgrid
To really achieve my goal, I need the buttons and labels to react to elements in sibling grid containers. CSS Grid Level 2 includes the subgrid feature. Although we have always been able to nest grids, the elements within each grid container have been independent. With subgrid, we get to set up nested (child) grids that use parent grids tracks.
This makes a number patterns that were previously difficult much easier, in particular the “card” pattern which seems to be the most popular example to show the benefits of subgrid. Without subgrid, each card is defined as an independent grid, meaning track sizing in the first card cannot respond to a change of height in the second. Pulling from an example Rachel Andrew used, here’s a simple group of cards:
Each card in this example still spans three row tracks, but those rows are now defined on the parent grid, allowing each card to occupy the same amount of vertical space.
For the example we’ve been working with, we do not need to use rows. Instead, we need to size columns based on content from sibling grids. First, let’s set the parent grid to contain the two <fieldset> elements. This is similar to the code we previously look at in the auto-fit demo.
All of the labels and buttons are now aligned to the tracks of their parent grid, keeping them consistent. They will each have an equal width based on the space that is available. If there is not enough space for each nested grid on one line, the second will wrap onto a new line.
This time, the two nested grid items align perfectly. The grid is also flexible if we introduce a longer title on a one of the buttons, the other elements will respond accordingly.
Browser compatibility
Support for subgrid is not great at the time of writing. It is only supported in Firefox 71+, although there are positive signals from other browsers. CSS feature queries can be used to provide alternative styling to Chrome and Edge.
This browser support data is from Caniuse, which has more detail. A number indicates that browser supports the feature at that version and up.
As a connoisseur of web trickery, this is a must share:
POW stands for Packaged Offline/online Webpage. It turns out the png format includes ways to save metadata alongside the image file. A powfile has a metadata entry that contains a zip file that contains a full website.
So a PNG file can contain and entire website with multiple resources. Wild. The concept is open-source.
One of the most difficult decisions to make in any field is to consciously choose to miss a deadline. Over the last several months, a team of some of the brightest engineers, data scientists, project managers, editors, and marketers have worked towards a release date of the new Page Authority (PA) on September 30, 2020. The new model is exceptional in nearly every way to the current PA, but our last quality control measure revealed an anomaly that we could not ignore.
As a result, we’ve made the tough decision to delay the launch of Page Authority 2.0. So, let me take a moment to retrace our steps as to how we got here, where that leaves us, and how we intend to proceed.
Seeing an old problem with fresh eyes
Historically, Moz has used the same method over and over again to build a Page Authority model (as well as Domain Authority). This model's advantage was its simplicity, but it left much to be desired.
Previous Page Authority models trained against SERPs, trying to predict whether one URL would rank over another, based on a set of link metrics calculated from the Link Explorer backlink index. A key issue with this type of model was that it couldn’t meaningfully address the maximum strength of a particular set of link metrics.
For example, imagine the most powerful URLs on the Internet in terms of links: the homepages of Google, Youtube, Facebook, or the share URLs of followed social network buttons. There are no SERPs that pit these URLs against one another. Instead, these extremely powerful URLs often rank #1 followed by pages with dramatically lower metrics. Imagine if Michael Jordan, Kobe Bryant, and Lebron James each scrimaged one-on-one against high school players. Each would win every time. But we would have great difficulty extrapolating from those results whether Michael Jordan, Kobe Bryant, or Lebron James would win in one-on-one contests against each other.
When tasked with revisiting Domain Authority, we ultimately chose a model with which we had a great deal of experience: the original SERPs training method (although with a number of tweaks). With Page Authority, we decided to go with a different training method altogether by predicting which page would have more total organic traffic. This model presented several promising qualities like being able to compare URLs that don’t occur on the same SERP, but also presented other difficulties, like a page having high link equity but simply being in an infrequently-searched topic area. We addressed many of these concerns, such as enhancing the training set, to account for competitiveness using a non-link metric.
Measuring the quality of the new Page Authority
The results were — and are — very promising.
First, the new model obviously predicted the likelihood that one page would have more valuable organic traffic than another. This was expected, because the new model was directed at this particular goal, while the current Page Authority merely attempted to predict whether one page would rank over another.
Second, we found that the new model predicted whether one page would rank over another better than the previous Page Authority. This was especially pleasing, as it laid to rest many of our concerns that the new model would underperform on old quality controls due to the new training model.
How much better is the new model at predicting SERPs than the current PA? At every interval — all the way down to position 4 vs 5 — the new model tied or out-performs the current model. It never lost.
Everything was looking great. We then started analyzing outliers. I like to call this the “does anything look stupid?” test. Machine learning makes mistakes, just as humans can, but humans tend to make mistakes in a very particular manner. When a human makes a mistake, we often understand exactly why the mistake was made. This isn’t the case for ML, especially Neural Nets; we pulled URLs with high Page Authorities under the new model that happened to have zero organic traffic, and included them in the training set to learn for those errors. We quickly saw bizarre 90+ PAs drop down to much more reasonable 60s and 70s… another win.
We were down to one last test.
The problem with branded search
Some of the most popular keywords on the web are navigational. People search Google for Facebook, Youtube, and even Google itself. These keywords are searched an astronomical number of times relative to other keywords. Subsequently, a handful of highly powerful brands can have an enormous impact on a model that looks at total search volume as part of its core training target.
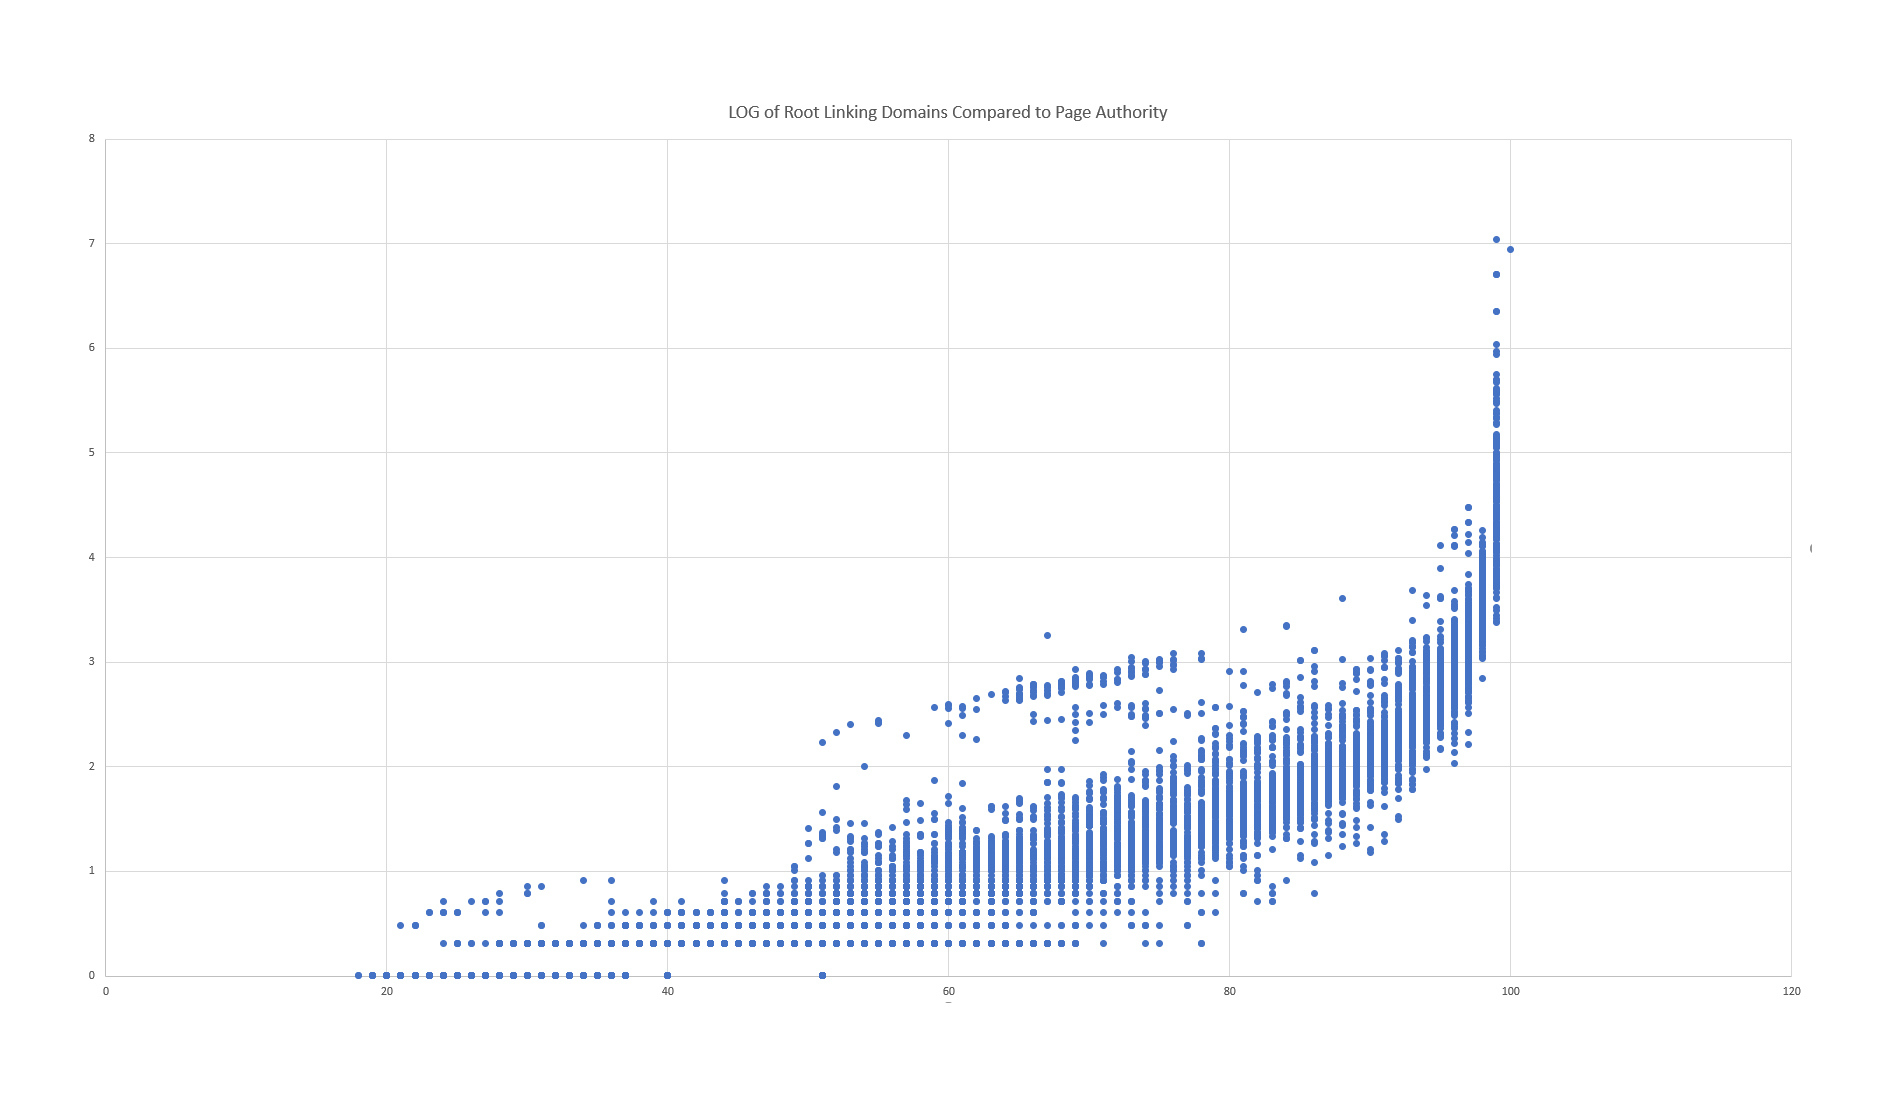
The last test involves comparing the current Page Authority to the new Page Authority, in order to determine if there are any bizarre outliers (where PA shifted dramatically and without obvious reason). First, let’s look at a simple comparison of the LOG of Linking Root Domains compared to the Page Authority.
Not too shabby. We see a generally positive correlation between Linking Root Domains and Page Authority. But can you spot the oddities? Go ahead and take a minute…
There are two anomalies that stand out in this chart:
There is a curious gap separating the main distribution of URLs and the outliers above and below.
The largest variance for a single score is at PA 99. There are an awful lot of PA 99s with a wide range of Linking Root Domains.
Here is a visualization that will help draw out these anomalies:
The gray spaces between the green and red represent this odd gap between the bulk of the distribution and the outliers. The outliers (in red) tend to clump together, especially above the main distribution. And, of course, we can see the poor distribution at the top of PA 99s.
Bear in mind that these issues are not sufficient to make the new Page Authority model less accurate than the current model. However, upon further examination, we found that the errors the model did produce were significant enough that they could adversely influence the decisions of our customers. It’s better to have a model that is off by a little everywhere (because the adjustments SEOs make are not incredibly fine-tuned) than it is to have a model that is right mostly everywhere but bizarrely wrong in a limited number of cases.
Luckily, we’re fairly confident as to what the problem is. It seems that homepage PAs are disproportionately inflated, and that the likely culprit is the training set. We can’t be certain this is the cause until we complete retraining, but it is a strong lead.
The good news and the bad news
We are in good shape insofar as we have multiple candidate models that outperform the existing Page Authority. We’re at the point of bug squashing, not model building. However, we are not going to ship a new score until we are confident that it will steer our customers in the right direction. We are highly conscientious of the decisions our customers make based on our metrics, not just whether the metrics meet some statistical criteria.
Given all of this, we have decided to delay the launch of Page Authority 2.0. This will give us the necessary time to address these primary concerns and produce a stellar metric. Frustrating? Yes, but also necessary.
As always, we thank you for your patience, and we look forward to producing the best Page Authority metric we have ever released.
Sign up for The Moz Top 10, a semimonthly mailer updating you on the top ten hottest pieces of SEO news, tips, and rad links uncovered by the Moz team. Think of it as your exclusive digest of stuff you don't have time to hunt down but want to read!
from The Moz Blog https://ift.tt/3ieHe49
via IFTTT
I’ve bookmarked some icon sets lately, partly because I can never find a nice set when I need to. I figured I’d even go the extra mile here and blog them so I can definitely find them later. Aside from being nice, cohesive, and practical sets of icons, I find it interesting that literally all of them:
are SVG, and thus easily resizeable
are built with rather efficient <path> elements
are stroked instead of filled (at least optionally)
have a click-to-copy SVG feature on their site
are free and open source
Good job, all! Seems like people are coming around to the idea of an SVG icon system where you just… put the SVG in the HTML.
Amber Wilson on making bookmarklets to help yo-self. She shows off one that injects an accessibility script — I like this approach, as it means you don’t have to maintain the bookmarklet, just the script it links to). Another example runs some code contained right in the link. The result is literally a bookmark in your browser you can click to do something that is useful to you on any site.
Well, I say “any” site, but what I mean is “sites that don’t have a Content Security Policy (CSP)” which is capable of totally blocking inline scripts (and that’s probably the best thing a CSP can do). That’s wonderful for security, but completely stops bookmarklets. The answer is browser extensions. The story with those is getting better as browsers converge on a standard format.
Browser extensions are much harder to write. Someone should make a browser extension that allows you to create arbitrary bookmarklet-ish snippets to run. I found a few attempts at this in a quick search, but nothing that looks particularly nice. Another thought: DevTools has snippets.
“No place like home for the holidays.” This will be the refrain for the majority of your customers as we reach 2020’s peak shopping season. I can’t think of another year in which it’s been more important for local businesses to plan and implement a seasonal marketing strategy extra early, to connect up with customers who will be traveling less and seeking ways to celebrate at home.
Recently, it’s become trendy in multiple countries to try to capture the old Danish spirit of hygge, which the OED defines as: A quality of coziness and comfortable conviviality that engenders a feeling of contentment or well-being.
While this sometimes-elusive state of being isn’t something you can buy direct from a store, and while some shoppers are still unfamiliar with hygge by name, many will be trying to create it at home this year. Denmark buys more candles than any other nation, and across Scandinavia, fondness for flowers, warming foods, cozy drinks, and time with loved ones characterizes the work of weaving a gentle web of happiness into even the darkest of winters.
Whatever your business can offer to support local shoppers’ aspirations for a safe, comfortable, happy holiday season at home is commendable at the end of a very challenging 2020. I hope these eight local search marketing tips will help you make good connections that serve your customers — and your business — well into the new year.
1) Survey customers now and provide what they want
Reasonably-priced survey software is worth every penny in 2020. For as little as $20/month, your local business can understand exactly how much your customers’ needs have changed this past year by surveying:
Which products locals are having trouble locating
Which products/services they most want for the holidays
Which method of shopping/delivery would be most convenient for them
Which hours of operation would be most helpful
Which safety measures are must-haves for them to transact with a business
Which payment methods are current top choices
Doubtless, you can think of many questions like these to help you glean the most possible insight into local needs. Poll your customer email/text database and keep your surveys on the short side to avoid abandonment.
Don’t have the necessary tools to poll people at-the-ready? Check out Zapier’s roundup of the 10 Best Online Survey Apps in 2020 and craft a concise survey geared to deliver insights into customers’ wishes.
2) Put your company’s whole heart into affinity
If I could gift every local business owner with a mantra to carry them through not just the 2020 holiday shopping season, but into 2021, it would be this:
It’s not enough to have customers discover my brand — I need them to like my brand.
Chances are, you can call to mind some brands of which you’re highly aware but would never shop with because they don’t meet your personal or business standards in some way. You’ve discovered these brands, but you don’t like them. In 2020, you may even have silently or overtly boycotted them.
On the opposite side of this scenario are the local brands you love. I can wax poetic about my local independent grocery store, stocking its shelves with sustainable products from local farmers, flying its Black Lives Matter and LGBTQ+ flags with pride from its storefront, and treating every customer like a cherished neighbor.
For many years, our SEO industry has put great effort into and emphasis on the discovery phase of the consumer journey, but my little country-town grocer has gone leaps and bounds beyond this by demonstrating affinity with the things my household cares about. The owners can consider us lifetime loyal customers for the ways they are going above-and-beyond in terms of empathy, diversity, and care for our community.
I vigorously encourage your business to put customer-brand affinity at the heart of its holiday strategy. Brainstorm how you can make meaningful changes that declare your company’s commitment to being part of the work of positive social change.
3) Be as accessible and communicative as possible
Once you’ve accomplished the above two goals, open the lines of communication about what your brand offers and the people-friendly aspects of how you operate across as many of the following as possible:
In my 17 years as a local SEO, I can confidently say that local business listings have never been a greater potential asset than they will be this holiday season. Google My Business listings, in particular, are an interface that can answer almost any customer who-what-where-when-why — if your business is managing these properly, whether manually or via software like Moz Local.
Anywhere a customer might be looking for what you offer, be there with accurate and abundant information about identity, location, hours of operation, policies, culture, and offerings. From setting special hours for each of your locations, to embracing Google Posts to microblog holiday content, to ensuring your website and social profiles are publicizing your USP, make your biggest communications effort ever this year.
With the pandemic necessitating social distancing, make the Internet your workhorse for connecting up with and provisioning your community as much as you can.
4) Embrace local e-commerce and product listings
Digital Commerce 360 has done a good job charting the 30%+ rise in online sales in the first half or 2020, largely resulting from the pandemic. The same publication summarizes the collective 19% leap in traffic to North America’s largest retailers. At the local business level, implementing even basic e-commerce function in advance of the holiday season could make a major difference, if you can find the most-desired methods of delivery. These could include:
Buy-online, pick up in-store (BOPIS)
Buy-online, pick up curbside
Buy online for postal delivery
Buy online for direct home delivery by in-house or third-party drivers
Put your products everywhere you can. Don’t forget that this past April, Google surprised everybody by offering free product listings, and that they also recently acquired the Pointy device, which lets you transform scanned barcodes into online inventory pages.
Additionally, in mid-September, Google took their next big product-related step by adding a “nearby” filter to Google Shopping, taking us closer and closer to the search engine becoming a source for real-time local inventory, as I’ve been predicting here in my column for several years.
Implement the public safety protocols that review research from GatherUp shows consumers are demanding, get your inventory onto the web, identify the most convenient ways to get purchases from your storefront into the customer’s hands, and your efforts could pave the way for increased Q4 profits.
5) Reinvent window shopping with QR codes
“How can I do what I want to do?” asked Jennifer Bolin, owner of Clover Toys in Seattle.
What she wanted to do was use her storefront window to sell merchandise to patrons who were no longer able to walk into her store. When a staff member mentioned that you could use a QR code generator like this one to load inventory onto pedestrians’ cell phones, she decided to give it a try.
Just a generation or two ago, many Americans cherished the tradition of going to town or heading downtown to enjoy the lavish holiday window displays crafted by local retailers. The mercantile goal of this form of entertainment was to entice passersby indoors for a shopping spree. It’s time to bring this back in 2020, with the twist of labeling products with QR codes and pairing them with desirable methods of delivery, whether through a drive-up window, curbside, or delivery.
“We’ve even gotten late night sales,” Bolin told me when I spoke with her after my colleague Rob Ousbey pointed out this charming and smart independent retail shop to me.
If your business locations are in good areas for foot traffic, think of how a 24/7 asset like an actionable, goodie-packed window display could boost your sales.
6) Tie in with DIY, and consider kits
With so many customers housebound, anything your business can do to support activities and deliver supplies for domestic merrymaking is worth considering. Can your business tie in with decorating, baking, cooking, crafting, handmade gift-giving, home entertainment, or related themes? If so, create video tutorials, blog posts, GMB posts, social media tips, or other content to engage a local audience.
One complaint I am encountering frequently is that shoppers are feeling tired trying to piecemeal together components from the internet for something they want to make or do. Unsurprisingly, many people are longing for the days when they could leisurely browse local businesses in-person, taking inspiration from their hands-on interaction with merchandise. I think kits could offer a stopgap solution in some cases. If relevant to your business, consider bundling items that could provide everything a household needs to:
Prepare a special holiday meal
Bake treats
Outfit a yard for winter play
Trim a tree or decorate a home
Build a fire
Create a night of fun for children of various age groups
Dress appropriately for warmth and safety, based on region
Create a handmade gift, craft, or garment
Winter prep a home or vehicle
Create a complete home spa/health/beauty experience
Plant a spring garden
Kits could be a welcome all-in-one resource for many shoppers. Determine whether your brand has the components to offer one.
7) Manage reviews meticulously
Free, near-real-time quality control data from your holiday efforts can most easily be found in your review profiles. Use software like Moz Local to keep a running tally of your incoming new reviews, or assign a staff member at each location of your business to monitor your local business profiles daily for any complaints or questions.
If you can quickly solve problems people cite in their reviews, your chances are good of retaining the customer and demonstrating responsiveness to all your profiles’ visitors. You may even find that reviews turn up additional, unmet local needs your formal survey missed. Acting quickly to fulfill these requests could win you additional business in Q4 and beyond.
8) Highly publicize one extra reason to shop local this year
“72% of respondents...are likely or very likely to continue to shop at independent stores, either locally or online, above larger retailers such as Amazon.” — Bazaarvoice
I highly recommend reading the entire survey of 12,000 global respondents by Bazaarvoice, quantifying how substantially shopping behaviors have changed in 2020. It’s very good news for local business owners that so many customers want to keep transacting with nearby independents, but the Amazon dilemma remains.
Above, we discussed the fatigue that can result from trying to cobble together a bunch of different resources to check everything off a shopping list. This can drive people to online “everything stores”, in the same way that department stores, supermarkets, and malls have historically drawn in shoppers with the promise of convenience.
A question every local brand should do their best to ask and answer in the runup to the holidays is: What’s to prevent my community from simply taking their whole holiday shopping list to Amazon, or Walmart, or Target this year?
Whatever your business can offer to support local shoppers’ aspirations for a safe, comfortable, happy holiday season at home is commendable at the end of a very challenging 2020. I hope these eight local search marketing tips will help you make good connections that serve your customers — and your business — well into the new year.
My completely personal answer to this question is that I want my town’s local business district, with its local flavor and diversity of shops, to still be there after a vaccine is hopefully developed for COVID-19. But that’s just me. Inspiring your customers’ allegiance to keeping your business going might be best supported by publicizing some of the following:
The economic, societal, and mental health benefits proven to stem from the presence of small, local businesses in a community.
Your philanthropic tie-ins, such as generating a percentage of sales to worthy local causes — there are so many ways to contribute this year.
The historic role your business has played in making your community a good place to live, particularly if your brand is an older, well-established one. I hear nostalgia is a strong influencer in 2020, and old images of your community and company through the years could be engaging content.
Any recent improvements you’ve made to ensure fast home delivery, whether by postal mail or via local drivers who can get gifts right to people’s doors.
Uplifting content that simply makes the day a bit brighter for a shopper. We’re all looking for a little extra support these days to keep our spirits bright.
Be intentional about maximizing local publicity of your “extra reason” to shop with you. Your local newspaper is doubtless running a stream of commentary about the economic picture in your city, and if your special efforts are newsworthy, a few mentions could do you a lot of good.
Don’t underestimate just how reliant people have become on the recommendations of friends, family, and online platforms for sourcing even the basics of life these days. In my own circle, everyone is now regularly telling everyone else where to find items from hand sanitizer to decent potatoes. Networking will be happening around gifts, too, so anything you get noticed for could support extensive word-of-mouth information sharing.
I want to close by thanking you for being in or marketing businesses that will help us all celebrate the many upcoming holidays in our own ways. Your efforts are appreciated, and I’m wishing you a peaceful, profitable, and hyggelig finish to 2020.
Sign up for The Moz Top 10, a semimonthly mailer updating you on the top ten hottest pieces of SEO news, tips, and rad links uncovered by the Moz team. Think of it as your exclusive digest of stuff you don't have time to hunt down but want to read!
from The Moz Blog https://ift.tt/339k7DN
via IFTTT
Which methods should I use? Which one is “the best” way? Here I’ll present my findings along with information that may help you decide which is right for you.
To make that decision, we’re not just going to look at the different flavors but compare conceptual aspects between them:
Let’s start with a foundation of OOP in JavaScript.
What is Object-Oriented Programming?
Object-Oriented Programming is a way of writing code that allows you to create different objects from a common object. The common object is usually called a blueprint while the created objects are called instances.
Each instance has properties that are not shared with other instances. For example, if you have a Human blueprint, you can create human instances with different names.
The second aspect of Object-Oriented Programming is about structuring code when you have multiple levels of blueprints. This is commonly called Inheritance or subclassing.
The third aspect of Object Oriented Programming is about encapsulation where you hide certain pieces of information within the object so they’re not accessible.
If you need more than this brief intro, here’s an article that introduces this aspect of Object-Oriented Programming if you need help with it.
Let’s begin with the basics — an introduction to the four flavors of Object-Oriented Programming.
The four flavors of Object-Oriented Programming
There are four ways to write Object-Oriented Programming in JavaScript. They are:
Constructors are functions that contain a this keyword.
function Human (firstName, lastName) {
  this.firstName = firstName
  this.lastName = lastName
}
this lets you store (and access) unique values created for each instance. You can create an instance with the new keyword.
const chris = new Human('Chris', 'Coyier')
console.log(chris.firstName) // Chris
console.log(chris.lastName) // Coyier

const zell = new Human('Zell', 'Liew')
console.log(zell.firstName) // Zell
console.log(zell.lastName) // Liew
Class syntax
Classes are said to be the “syntactic sugar” of Constructor functions. As in, Classes are an easier way of writing Constructor functions.
There’s serious contention about whether Classes are bad (like this and this). We’re not going to dive into those arguments here. Instead, we’re just going to look at how to write code with Classes and decide whether Classes are better than constructors based on the code we write.
Classes can be written with the following syntax:
class Human {
  constructor(firstName, lastName) {
    this.firstName = firstName
    this.lastName = lastName
  }
}
Notice the constructor function contains the same code as the Constructor syntax above? We need to do this since we want to initialize values into this. (We can skip constructor if we don’t need to initialize values. More on this later under Inheritance).
At first glance, classes seem to be inferior to constructors — there’s more code to write! Hold your horses and don’t form a conclusion at this point. We have a lot more to cover. Classes begin to shine later.
As before, you can create an instance with the new keyword.
const chris = new Human('Chris', 'Coyier')

console.log(chris.firstName) // Chris
console.log(chris.lastName) // Coyier
Objects Linking to Other Objects (OLOO)
OLOO was coined and popularized by Kyle Simpson. In OLOO, you define the blueprint as a normal object. You then use a method (often named init, but that isn’t required in the way constructor is to a Class) to initialize the instance.
You use Object.create to create an instance. After creating the instance, you need to run your init function.
const chris = Object.create(Human)
chris.init('Chris', 'Coyier')

console.log(chris.firstName) // Chris
console.log(chris.lastName) // Coyier
You can chain init after Object.create if you returned this inside init.
const Human = {
  init () {
    // ...
    return this
  }
}

const chris = Object.create(Human).init('Chris', 'Coyier')
console.log(chris.firstName) // Chris
console.log(chris.lastName) // Coyier
Factory functions
Factory functions are functions that return an object. You can return any object. You can even return a Class instance or OLOO instance — and it’ll still be a valid Factory function.
Here’s the simplest way to create Factory functions:
function Human (firstName, lastName) {
  return {
    firstName,
    lastName
  }
}
You don’t need new to create instances with Factory functions. You simply call the function.
const chris = Human('Chris', 'Coyier')

console.log(chris.firstName) // Chris
console.log(chris.lastName) // Coyier
Now that we’ve seen these four OOP setup possibilities, let’s look at how you declare properties and methods on each of them so we can get a little better understanding of working with them before getting to the bigger comparisons we’re trying to make.
Declaring properties and methods
Methods are functions declared as an object’s property.
In Object-Oriented Programming, there are two ways to declare properties and methods:
Directly on the instance
In the Prototype
Let’s learn to do both.
Declaring properties and methods with Constructors
If you want to declare a property directly on an instance, you can write the property inside the constructor function. Make sure to set it as the property for this.
function Human (firstName, lastName) {
  // Declares properties
  this.firstName = firstName
  this.lastname = lastName

  // Declares methods
  this.sayHello = function () {
    console.log(`Hello, I'm ${firstName}`)
  }
}

const chris = new Human('Chris', 'Coyier')
console.log(chris)
Methods are commonly declared on the Prototype because Prototype allows instances to use the same method. It’s a smaller “code footprint.”
To declare properties on the Prototype, you need to use the prototype property.
function Human (firstName, lastName) {
  this.firstName = firstName
  this.lastname = lastName
}

// Declaring method on a prototype
Human.prototype.sayHello = function () {
  console.log(`Hello, I'm ${this.firstName}`)
}
It can be clunky if you want to declare multiple methods in a Prototype.
// Declaring methods on a prototype
Human.prototype.method1 = function () { /*...*/ }
Human.prototype.method2 = function () { /*...*/ }
Human.prototype.method3 = function () { /*...*/ }
You can make things easier by using merging functions like Object.assign.
Object.assign does not support the merging of Getter and Setter functions. You need another tool. Here’s why. And here’s a tool I created to merge objects with Getters and Setters.
Declaring properties and methods with Classes
You can declare properties for each instance inside the constructor function.
class Human {
  constructor (firstName, lastName) {
    this.firstName = firstName
      this.lastname = lastName

      this.sayHello = function () {
        console.log(`Hello, I'm ${firstName}`)
      }
  }
}
It’s easier to declare methods on the prototype. You write the method after constructor like a normal function.
Declaring properties and methods with Factory functions
You can declare properties and methods directly by including them in the returned object.
function Human (firstName, lastName) {
  return {
    firstName,
    lastName,
    sayHello () {
      console.log(`Hello, I'm ${firstName}`)
    }
  }
}
You cannot declare methods on the Prototype when you use Factory functions. If you really want methods on the prototype, you need to return a Constructor, Class, or OLOO instance. (Don’t do this since it doesn’t make any sense.)
// Do not do this
function createHuman (...args) {
  return new Human(...args)
}
Where to declare properties and methods
Should you declare properties and methods directly on the instance? Or should you use prototype as much as you can?
Many people take pride that JavaScript is a “Prototypal Language” (which means it uses prototypes). From this statement, you may make the assumption that using “Prototypes” is better.
The real answer is: It doesn’t matter.
If you declare properties and methods on instances, each instance will take up slightly more memory. If you declare methods on Prototypes, the memory used by each instance will decrease, but not much. This difference is insignificant with computer processing power what it is today. Instead, you want to look at how easy it is to write code — and whether it is possible to use Prototypes in the first place.
For example, if you use Classes or OLOO, you’ll be better off using Prototypes since the code is easier to write. If you use Factory functions, you cannot use Prototypes. You can only create properties and methods directly on the instance.
We can make a few notes from the code we wrote above. These opinions are my own!
Classes are better than Constructors because its easier to write multiple methods on Classes.
OLOO is weird because of the Object.create part. I gave OLOO a run for a while, but I always forget to write Object.create. It’s weird enough for me not to use it.
Classes and Factry Fufnctions are easiest to use. The problem is that Factory functions don’t support Prototypes. But like I said, this doesn’t really matter in production.
We’re down to two. Should we choose Classes or Factory functions then? Let’s compare them!
Classes vs. Factory functions — Inheritance
To continue the discussion on Classes and Factory functions, we need to understand three more concepts that are tied closely to Object-Oriented Programming.
Inheritance
Encapsulation
this
Let’s start with Inheritance.
What is Inheritance?
Inheritance is a loaded word. Many people in the industry use Inheritance incorrectly, in my opinion. The word “inheritance” is used when you receive things from somewhere. For example:
If you get an inheritance from your parents, it means you get money and assets from them.
If you inherit genes from your parents, it means you get your genes from them.
If you inherit a process from your teacher, it means you get that process from them.
Fairly straightforward.
In JavaScript, Inheritance can mean the same thing: where you get properties and methods from the parent blueprint.
This means all instances actually inherit from their blueprints. They inherit properties and methods in two ways:
by creating a property or method directly upon creating the instance
via the Prototype chain
We discussed how to do both methods in the previous article so refer back to it if you need help seeing these processes in code.
There’s a second meaning for Inheritance in JavaScript — where you create a derivative blueprint from the parent blueprint. This process is more accurately called Subclassing, but people sometimes will call this Inheritance as well.
Understanding Subclassing
Subclassing is about creating a derivative blueprint from a common blueprint. You can use any Object-Oriented Programming flavor to create the Subclass.
We’ll talk about this with the Class syntax first because it’s easier to understand.
Subclassing with Class
When you create a Subclass, you use the extends keyword.
class Child extends Parent {
  // ... Stuff goes here
}
For example, let’s say we want to create a Developer class from a Human class.
// Human Class
class Human {
  constructor (firstName, lastName) {
    this.firstName = firstName
    this.lastName = lastName
  }

  sayHello () {
    console.log(`Hello, I'm ${this.firstName}`)
  }
}
The Developer class will extend Human like this:
class Developer extends Human {
  constructor(firstName, lastName) {
    super(firstName, lastName)
  }

    // Add other methods
}
Note:super calls the Human (also called the “parent”) Class. It initiates the constructor from Human. If you don’t need extra initiation code, you can omit constructor entirely.
class Developer extends Human {
  // Add other methods
}
Let’s say a Developer can code. We can add the code method directly to Developer.
class Developer extends Human {
  code (thing) {
    console.log(`${this.firstName} coded ${thing}`)
  }
}
Here’s an example of an instance of Developer:
const chris = new Developer('Chris', 'Coyier')
console.log(chris)
Subclassing with Factory functions
There are four steps to creating Subclasses with Factory functions:
Create a new Factory function
Create an instance of the Parent blueprint
Create a new copy of this instance
Add properties and methods to this new copy
The process looks like this:
function Subclass (...args) {
  const instance = ParentClass(...args)
  return Object.assign({}, instance, {
    // Properties and methods go here
  })
}
We’ll use the same example — creating a Developer Subclass — to illustrate this process. Here’s the Human factory function:
function Human (firstName, lastName) {
  return {
    firstName,
    lastName,
    sayHello () {
      console.log(`Hello, I'm ${firstName}`)
    }
  }
}
We can create Developer like this:
function Developer (firstName, lastName) {
  const human = Human(firstName, lastName)
  return Object.assign({}, human, {
    // Properties and methods go here
  })
}
const chris = Developer('Chris', 'Coyier')
console.log(chris)
Note: You cannot use Object.assign if you use Getters and Setters. You’ll need another tool, like mix. I explain why in this article.
Overwriting the Parent’s method
Sometimes you need to overwrite the Parent’s method inside the Subclass. You can do this by:
Creating a method with the same name
Calling the Parent’s method (optional)
Changing whatever you need in the Subclass’s method
The process looks like this with Classes:
class Developer extends Human {
  sayHello () {
    // Calls the parent method
    super.sayHello()

    // Additional stuff to run
    console.log(`I'm a developer.`)
  }
}

const chris = new Developer('Chris', 'Coyier')
chris.sayHello()
The process looks like this with Factory functions:
function Developer (firstName, lastName) {
  const human = Human(firstName, lastName)

  return Object.assign({}, human, {
      sayHello () {
        // Calls the parent method
        human.sayHello()

        // Additional stuff to run
        console.log(`I'm a developer.`)
      }
  })
}

const chris = new Developer('Chris', 'Coyier')
chris.sayHello()
Inheritance vs. Composition
No talk about Inheritance ever concludes without the mention of Composition. Experts like Eric Elliot often suggests we should favor Composition over Inheritance.
“Favor object composition over class inheritance” the Gang of Four, “Design Patterns: Elements of Reusable Object Oriented Software”
“In computer science, a composite data type or compound data type is any data type which can be constructed in a program using the programming language’s primitive data types and other composite types. […] The act of constructing a composite type is known as composition.” ~ Wikipedia
So let’s give Composition a deeper look and understand what it is.
Understanding Composition
Composition is the act of combining two things into one. It’s about merging things together. The most common (and simplest) way of merging objects is with Object.assign.
const one = { one: 'one' }
const two = { two: 'two' }
const combined = Object.assign({}, one, two)
The use of Composition can be better explained with an example. Let’s say we already have two Subclasses, a Designer and Developer. Designers can design, while developers can code. Both designers and developers inherit from the Human class.
Here’s the code so far:
class Human {
  constructor(firstName, lastName) {
    this.firstName = firstName
    this.lastName = lastName
  }

  sayHello () {
    console.log(`Hello, I'm ${this.firstName}`)
  }
}

class Designer extends Human {
  design (thing) {
    console.log(`${this.firstName} designed ${thing}`)
  }
}

class Developer extends Designer {
  code (thing) {
    console.log(`${this.firstName} coded ${thing}`)
  }
}
Now let’s say you want to create a third Subclass. This Subclass is a mix of a Designer and a Developer they — can design and code. Let’s call it DesignerDeveloper (or DeveloperDesigner, whichever you fancy).
How would you create the third Subclass?
We cannot extend Designer and Developer classes at the same time. This is impossible because we cannot decide which properties come first. This is often called The Diamond Problem.
The Diamond Problem can be easily solved if we do something like Object.assign – where we prioritize one object over the other. If we use the Object.assign approach, we may be able to extend classes like this. But this is not supported in JavaScript.
// Doesn't work
class DesignerDeveloper extends Developer, Designer {
  // ...
}
So we need to rely on Composition.
Composition says: Instead of trying to create DesignerDeveloper via Subclassing, let’s create a new object that stores common features. We can then include these features whenever necessary.
Did you notice we’re creating methods directly on the instance? This is just one option. We can still put methods into the Prototype, but I think the code looks clunky. (It’s as if we’re writing Constructor functions all over again.)
Nobody says we can’t use Inheritance and Composition at the same time. We can!
Using the example we’ve ironed out so far, Designer, Developer, and DesignerDeveloperHumans are still humans. They can extend the Human object.
Here’s an example where we use both inheritance and composition with the class syntax.
class Human {
  constructor (firstName, lastName) {
    this.firstName = firstName
    this.lastName = lastName
  }

  sayHello () {
    console.log(`Hello, I'm ${this.firstName}`)
  }
}

class DesignerDeveloper extends Human {}
Object.assign(DesignerDeveloper.prototype, {
  code: skills.code,
  design: skills.design
})
And here’s the same thing with Factory functions:
function Human (firstName, lastName) {
  return {
    firstName,
    lastName,
    sayHello () {
      console.log(`Hello, I'm ${this.firstName}`)
    }
  }
}

function DesignerDeveloper (firstName, lastName) {
  const human = Human(firstName, lastName)
  return Object.assign({}, human, {
    code: skills.code,
    design: skills.design
  }
}
Subclassing in the real world
One final point about Subclassing vs. Composition. Even though experts have pointed out that Composition is more flexible (and hence more useful), Subclassing still has its merits. Many things we use today are built with the Subclassing strategy.
For example: The click event we know and love is a MouseEvent. MouseEvent is a Subclass of a UIEvent, which in turn is a Subclass of Event.
Another example: HTML Elements are Subclasses of Nodes. That’s why they can use all properties and methods of Nodes.
Preliminary verdict
Classes and Factory functions can both use Inheritance and Composition. Composition seems to be cleaner in Factory functions though, but that’s not a big win over Classes.
We’ll examine Classes and Factory Functions more in detail next.
Classes vs. Factory functions — Encapsulation
We’v looked at the four different Object-Oriented Programming flavors so far. Two of them — Classes and Factory functions — are easier to use compared to the rest.
But the questions remain: Which should you use? And why?
To continue the discussion on Classes and Factory functions, we need to understand three concepts that are tied closely to Object-Oriented Programming:
Inheritance
Encapsulation
this
We just talked about Inheritance. Now let’s talk about Encapsulation.
Encapsulation
Encapsulation is a big word, but it has a simple meaning. Encapsulation is the act of enclosing one thing inside another thing so the thing inside doesn’t leak out. Think about storing water inside a bottle. The bottle prevents water from leaking out.
In JavaScript, we’re interested in enclosing variables (which can include functions) so these variables don’t leak out into the external scope. This means you need to understand scope to understand encapsulation. We’ll go through an explanation, but you can also use this article to beef up your knowledge regarding scopes.
Simple Encapsulation
The simplest form of Encapsulation is a block scope.
{
  // Variables declared here won't leak out
}
When you’re in the block, you can access variables that are declared outside the block.
const food = 'Hamburger'

{
  console.log(food)
}
But when you’re outside the block, you cannot access variables that are declared inside the block.
Functions behave like block scopes. When you declare a variable inside a function, they cannot leak out of that function. This works for all variables, even those declared with var.
Functions can return a value. This returned value can be used later, outside the function.
function sayFood () {
  return 'Hamburger'
}

console.log(sayFood())
Closures
Closures are an advanced form of Encapsulation. They’re simply functions wrapped in functions.
// Here's a closure
function outsideFunction () {
  function insideFunction () { /* ...*/ }
}
Variables declared in outsideFunction can be used in insideFunction.
function outsideFunction () {
  const food = 'Hamburger'
  console.log('Called outside')

  return function insideFunction () {
    console.log('Called inside')
    console.log(food)
  }
}

// Calls `outsideFunction`, which returns `insideFunction`
// Stores `insideFunction` as variable `fn`
const fn = outsideFunction()

// Calls `insideFunction`
fn()
Encapsulation and Object-Oriented Programming
When you build objects, you want to make some properties publicly available (so people can use them). But you also want to keep some properties private (so others can’t break your implementation).
Let’s work through this with an example to make things clearer. Let’s say we have a Car blueprint. When we produce new cars, we fill each car up with 50 liters of fuel.
class Car {
  constructor () {
    this.fuel = 50
  }
}
Here we exposed the fuel property. Users can use fuel to get the amount of fuel left in their cars.
const car = new Car()
console.log(car.fuel) // 50
Users can also use the fuel property to set any amount of fuel.
const car = new Car()
car.fuel = 3000
console.log(car.fuel) // 3000
Let’s add a condition and say that each car has a maximum capacity of 100 liters. With this condition, we don’t want to let users set the fuel property freely because they may break the car.
There are two ways to do prevent users from setting fuel:
Private by convention
Real Private Members
Private by convention
In JavaScript, there’s a practice of prepending underscores to a variable name. This denotes the variable is private and should not be used.
class Car {
  constructor () {
    // Denotes that `_fuel` is private. Don't use it!
    this._fuel = 50
  }
}
We often create methods to get and set this “private” _fuel variable.
class Car {
  constructor () {
    // Denotes that `_fuel` is private. Don't use it!
    this._fuel = 50
  }

  getFuel () {
    return this._fuel
  }

  setFuel (value) {
    this._fuel = value
    // Caps fuel at 100 liters
    if (value > 100) this._fuel = 100
  }
}
Users should use the getFuel and setFuel methods to get and set fuel.
const car = new Car()
console.log(car.getFuel()) // 50

car.setFuel(3000)
console.log(car.getFuel()) // 100
But _fuel is not actually private. It is still a public variable. You can still access it, you can still use it, and you can still abuse it (even if the abusing part is an accident).
const car = new Car()
console.log(car.getFuel()) // 50

car._fuel = 3000
console.log(car.getFuel()) // 3000
We need to use real private variables if we want to completely prevent users from accessing them.
Real Private Members
Members here refer to variables, functions, and methods. It’s a collective term.
Private Members with Classes
Classes let you create private members by prepending # to the variable.
class Car {
  constructor () {
    this.#fuel = 50
  }
}
Unfortunately, you can’t use # directly inside a constructor function.
You need to declare the private variable outside the constructor first.
class Car {
  // Declares private variable
  #fuel
  constructor () {
    // Use private variable
    this.#fuel = 50
  }
}
In this case, we can use a shorthand and declare#fuel upfront since we set fuel to 50.
class Car {
  #fuel = 50
}
You cannot access #fuel outside Car. You’ll get an error.
const car = new Car()
console.log(car.#fuel)
You need methods (like getFuel or setFuel) to use the #fuel variable.
class Car {
  #fuel = 50

  getFuel () {
    return this.#fuel
  }

  setFuel (value) {
    this.#fuel = value
    if (value > 100) this.#fuel = 100
  }
}

const car = new Car()
console.log(car.getFuel()) // 50

car.setFuel(3000)
console.log(car.getFuel()) // 100
class Car {
  #fuel = 50

  get fuel () {
    return this.#fuel
  }

  set fuel (value) {
    this.#fuel = value
    if (value > 100) this.#fuel = 100
  }
}

const car = new Car()
console.log(car.fuel) // 50

car.fuel = 3000
console.log(car.fuel) // 100
Private Members with Factory functions
Factory functions create Private Members automatically. You just need to declare a variable like normal. Users will not be able to get that variable anywhere else. This is because variables are function-scoped and hence encapsulated by default.
function Car () {
  const fuel = 50
}

const car = new Car()
console.log(car.fuel) // undefined
console.log(fuel) // Error: `fuel` is not defined
We can create getter and setter functions to use this private fuel variable.
function Car () {
  const fuel = 50

  return {
    get fuel () {
      return fuel
    },

    set fuel (value) {
      fuel = value
      if (value > 100) fuel = 100
    }
  }
}

const car = new Car()
console.log(car.fuel) // 50

car.fuel = 3000
console.log(car.fuel) // 100
That’s it! Simple and easy!
Verdict for Encapsulation
Encapsulation with Factory functions are simpler and easier to understand. They rely on the scopes which are a big part of the JavaScript language.
Encapsulation with Classes, on the other hand, requires prepending # to the private variable. This can make things clunky.
We’ll look at the final concept — this to complete the comparison between Classes and Factory functions — in the next section.
Classes vs. Factory Functions — The this variable
this (ha!) is one of the main arguments against using Classes for Object-Oriented Programming. Why? Because this value changes depending on how it is used. It can be confusing for many developers (both new and experienced).
But the concept of this is relatively simple in reality. There are only six contexts in which you can use this. If you master these six contexts, you’ll have no problems using this.
Come back to this article after you’ve solidified your knowledge on this. We’ll have a deeper discussion about using this in Classes and Factory functions.
Back yet? Good. Let’s go!
Using this in Classes
this refers to the instance when used in a Class. (It uses the “In an object property / method” context.) This is why you can set properties and methods on the instance inside the constructor function.
class Human {
  constructor (firstName, lastName) {
    this.firstName = firstName
    this.lastName = lastName
    console.log(this)
  }
}

const chris = new Human('Chris', 'Coyier')
Usingthisin Constructor functions
If you use this inside a function and new to create an instance, this will refer to the instance. This is how a Constructor function is created.
function Human (firstName, lastName) {
  this.firstName = firstName
  this.lastName = lastName
  console.log(this)
}

const chris = new Human('Chris', 'Coyier')
I mentioned Constructor functions because you can use this inside Factory functions. But this points to Window (or undefined if you use ES6 Modules, or a bundler like webpack).
// NOT a Constructor function because we did not create instances with the `new` keyword
function Human (firstName, lastName) {
  this.firstName = firstName
  this.lastName = lastName
  console.log(this)
}

const chris = Human('Chris', 'Coyier')
Essentially, when you create a Factory function, you should not use this as if it’s a Constructor function. This is one small hiccup people experience with this. I wanted to highlight the problem and make it clear.
Using this in a Factory function
The correct way to use this in a Factory function is to use it “in an object property / method” context.
function Human (firstName, lastName) {
  return {
    firstName,
    lastName,
    sayThis () {
      console.log(this)
    }
  }
}

const chris = Human('Chris', 'Coyier')
chris.sayThis()
Even though you can use this in Factory functions, you don’t need to use them. You can create a variable that points to the instance. Once you do this, you can use the variable instead of this. Here’s an example at work.
function Human (firstName, lastName) {
  const human = {
    firstName,
    lastName,
    sayHello() {
      console.log(`Hi, I'm ${human.firstName}`)
    }
  }

  return human
}

const chris = Human('Chris', 'Coyier')
chris.sayHello()
human.firstName is clearer than this.firstName because human definitely points back to the instance. You know when you see the code.
If you’re used to JavaScript, you may also notice there’s no need to even write human.firstName in the first place! Just firstName is enough because firstName is in the lexical scope. (Read this article if you need help with scopes.)
function Human (firstName, lastName) {
  const human = {
    firstName,
    lastName,
    sayHello() {
      console.log(`Hi, I'm ${firstName}`)
    }
  }

  return human
}

const chris = Human('Chris', 'Coyier')
chris.sayHello()
What we covered so far is simple. It’s not easy to decide whether this is actually needed until we create a sufficiently complicated example. So let’s do that.
Detailed example
Here’s the setup. Let’s say we have a Human blueprint. This Human ha firstName and lastName properties, and a sayHello method.
We have a Developer blueprint that’s derived from Human. Developers can code, so they’ll have a code method. Developers also want to proclaim they’re developers, so we need to overwrite sayHello and add I'm a Developer to the console.
We’ll create this example with Classes and Factory functions. (We’ll make an example with this and an example without this for Factory functions).
The example with Classes
First, we have a Human blueprint. This Human has a firstName and lastName properties, as well as a sayHello method.
We have a Developer blueprint that’s derived from Human. Developers can code, so they’ll have a code method.
class Developer extends Human {
  code (thing) {
    console.log(`${this.firstName} coded ${thing}`)
  }
}
Developers also want to proclaim that they’re developers. We need to overwrite sayHello and add I'm a Developer to the console. We do this by calling Human‘s sayHello method. We can do this using super.
class Developer extends Human {
  code (thing) {
    console.log(`${this.firstName} coded ${thing}`)
  }

  sayHello () {
    super.sayHello()
    console.log(`I'm a developer`)
  }
}
The example with Factory functions (withthis)
Again, first, we have a Human blueprint. This Human has firstName and lastName properties, as well as a sayHello method.
function Human () {
  return {
    firstName,
    lastName,
    sayHello () {
      console.log(`Hello, I'm ${this.firstName}`)
    }
  }
}
Next, we have a Developer blueprint that’s derived from Human. Developers can code, so they’ll have a code method.
Developers also want to proclaim they’re developers. We need to overwrite sayHello and add I'm a Developer to the console.
We do this by calling Human‘s sayHello method. We can do this using the human instance.
Here’s the full code using Factory functions (with this):
function Human (firstName, lastName) {
return {
firstName,
lastName,
sayHello () {
console.log(`Hello, I'm ${this.firstName}`)
}
}
}
function Developer (firstName, lastName) {
  const human = Human(firstName, lastName)
  return Object.assign({}, human, {
    code (thing) {
      console.log(`${this.firstName} coded ${thing}`)
    },

    sayHello () {
      human.sayHello()
      console.log('I\'m a developer')
    }
  })
}
Did you notice firstName is available within the lexical scope in both Human and Developer? This means we can omit this and use firstName directly in both blueprints.
See that? This means you can safely omit this from your code when you use Factory functions.
Verdict forthis
In simple terms, Classes require this while Factory functions don’t. I prefer Factory functions here because:
The context of this can change (which can be confusing)
The code written with factory functions is shorter and cleaner (since we can use encapsulated variables without writing this.#variable).
Next up is the last section where we build a simple component together with both Classes and Factory functions. You get to see how they differ and how to use event listeners with each flavolr.
Classes vs Factory functions — Event listeners
Most Object-Oriented Programming articles show you examples without event listeners. Those examples can be easier to understand, but they don’t reflect the work we do as frontend developers. The work we do requires event listeners — for a simple reason — because we need to build things that rely on user input.
The change in this doesn’t matter if you know how to handle this in both Classes and Factory functions. Few articles cover this topic so I thought it would be good to complete this article with a simple component using Object-Oriented Programming flavors.
Building a counter
We’re going to build a simple counter in this article. We’ll use everything you learned in this article — including private variables.
Let’s say the counter contains two things:
The count itself
A button to increase the count
Here’s the simplest possible HTML for the counter:
We’ll initialize a count variable and set it to what the countElement shows. We’ll use a private #count variable since the count shouldn’t be exposed elsewhere.
We will add the event listener to the this.buttonElement. Unfortunately, we cannot use increaseCount as the callback straightaway. You’ll get an error if you try it.
You get an error because this points to buttonElement. (This is the event listener context.) You’ll see the buttonElement if you logged this into the console.
We need to change the value of this back to the instance for increaseCount in order for things to work. There are two ways to do it:
Use bind
Use arrow functions
Most people use the first method (but the second one is easier).
Adding the event listener with bind
bind returns a new function. It lets you change this to the first argument that’s passed. People normally create event listeners by calling bind(this).
This works, but it is a long way around. There’s actually a shortcut.
You can create increaseCount with arrow functions. If you do this, the this value for increaseCount will be bound to the instance’s value straightaway.
We need to get two elements from counter — the <span> and the <button>. We can use normal variables (without this) here because they are private variables already. We won’t expose them.
We will initialize a count variable to the value that’s present in the HTML.
function Counter (counter) {
  const countElement = counter.querySelector('span')
  const buttonElement = counter.querySelector('button')

  let count = parseInt(countElement.textContext)
}
We will increase this count variable with an increaseCount method. You can choose to use a normal function here, but I like to create a method to keep things neat and tidy.
Notice I used counter.updateCount instead of this.updateCount? I like this because counter is clearer compared to this.I also do this because beginners can also make a mistake with this inside Factory functions (which I’ll cover later).
Adding event listeners
We can add event listeners to the buttonElement. When we do this, we can use counter.increaseCount as the callback straight away.
We can do this because we didn’t use this, so it doesn’t matter even if event listeners change the this value.
You can use this in Factory functions. But you need to use this in a method context.
In the following example, if you call counter.increaseCount, JavaScript will also call counter.updateCount. This works because this points to the counter variable.
Unfortunately, the event listener wouldn’t work because the this value was changed. You’ll need the same treatment as Classes — with bind or arrow functions to — get the event listener working again.
And this leads me to the second gotcha.
Secondthisgotcha
If you use the Factory function syntax, you cannot create methods with arrow functions. This is because the methods are created in a simple function context.
function Counter (counterElement) {
  // ...
  const counter = {
    // Do not do this.
    // Doesn't work because `this` is `Window`
    increaseCount: () => {
      count = count + 1
      this.updateCount()
    }
  }
  // ...
}
So, I highly suggest skipping this entirely if you use Factory functions. It’s much easier that way.
The code
Verdict for event listeners
Event listeners change the value of this, so we must be very careful about using the this value. If you use Classes, I recommend creating event listeners callbacks with arrow functions so you don’t have to use bind.
If you use Factory functions, I recommend skipping this entirely because it may confuse you. That’s it!
Conclusion
We talked about the four flavors of Object-Oriented Programming. They are:
Constructor functions
Classes
OLOO
Factory functions
First, we concluded that Classes and Factory functions are easier to use from a code-related point of view.
Second, we compared how to use Subclasses with Classes and Factory functions. Here, we see creating Subclasses is easier with Classes, but Composition is easier with Factory functions.
Third, we compared Encapsulation with Classes and Factory functions. Here, we see Encapsulation with Factory functions is natural — like JavaScript — while encapsulation with Classes requires you to add a # before variables.
Fourth, we compared the usage of this in Classes and Factory functions. I feel Factory functions win here because this can be ambiguous. Writing this.#privateVariable also creates longer code compared to using privateVariable itself.
Finally, in this article, we built a simple Counter with both Classes and Factory functions. You learned how to add event listeners to both Object-Oriented Programming programming flavors. Here, both flavors work. You just need to be careful whether you use this or not.
That’s it!
I hope this shines some light on Object-Oriented Programming in JavaScript for you. If you liked this article, you may like my JavaScript course, Learn JavaScript, where I explain (almost) everything you need to know about JavaScript in a format as clear and succinct as this.
If you have any questions on JavaScript or front-end development in general, feel free to reach out to me. I’ll see how I can help!